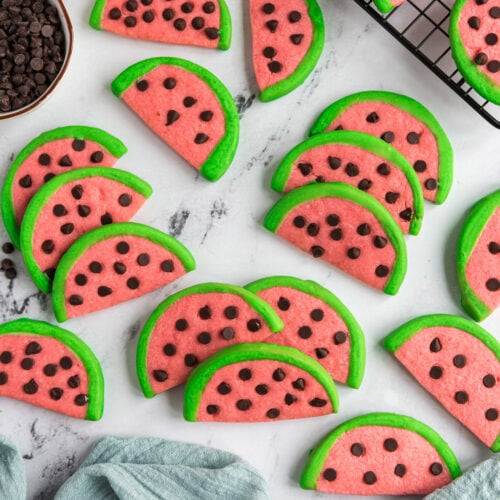


These adorable watermelon cookies start with a simple sugar cookie dough that’s dotted with mini chocolate chips and rolled in a colored glaze to resemble your favorite juicy summer fruit!
Why this recipe works
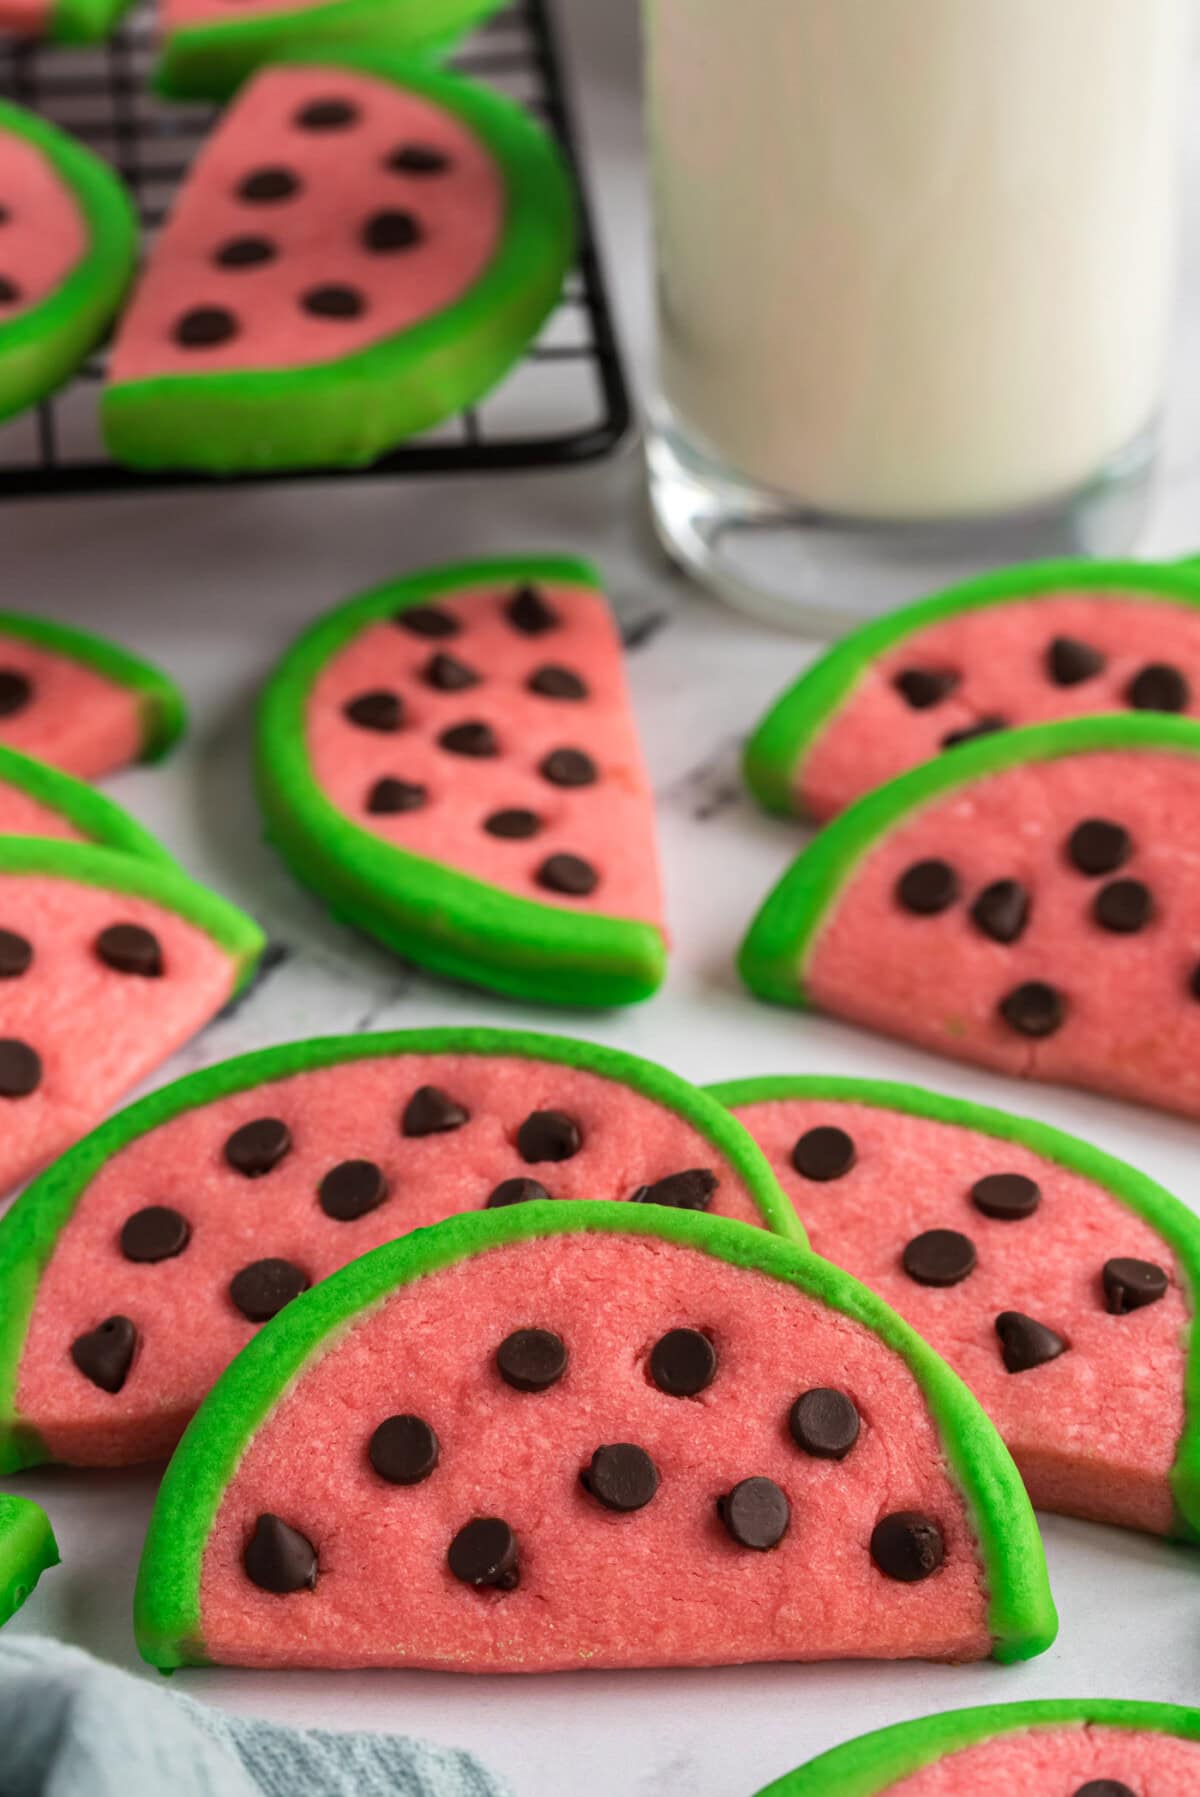
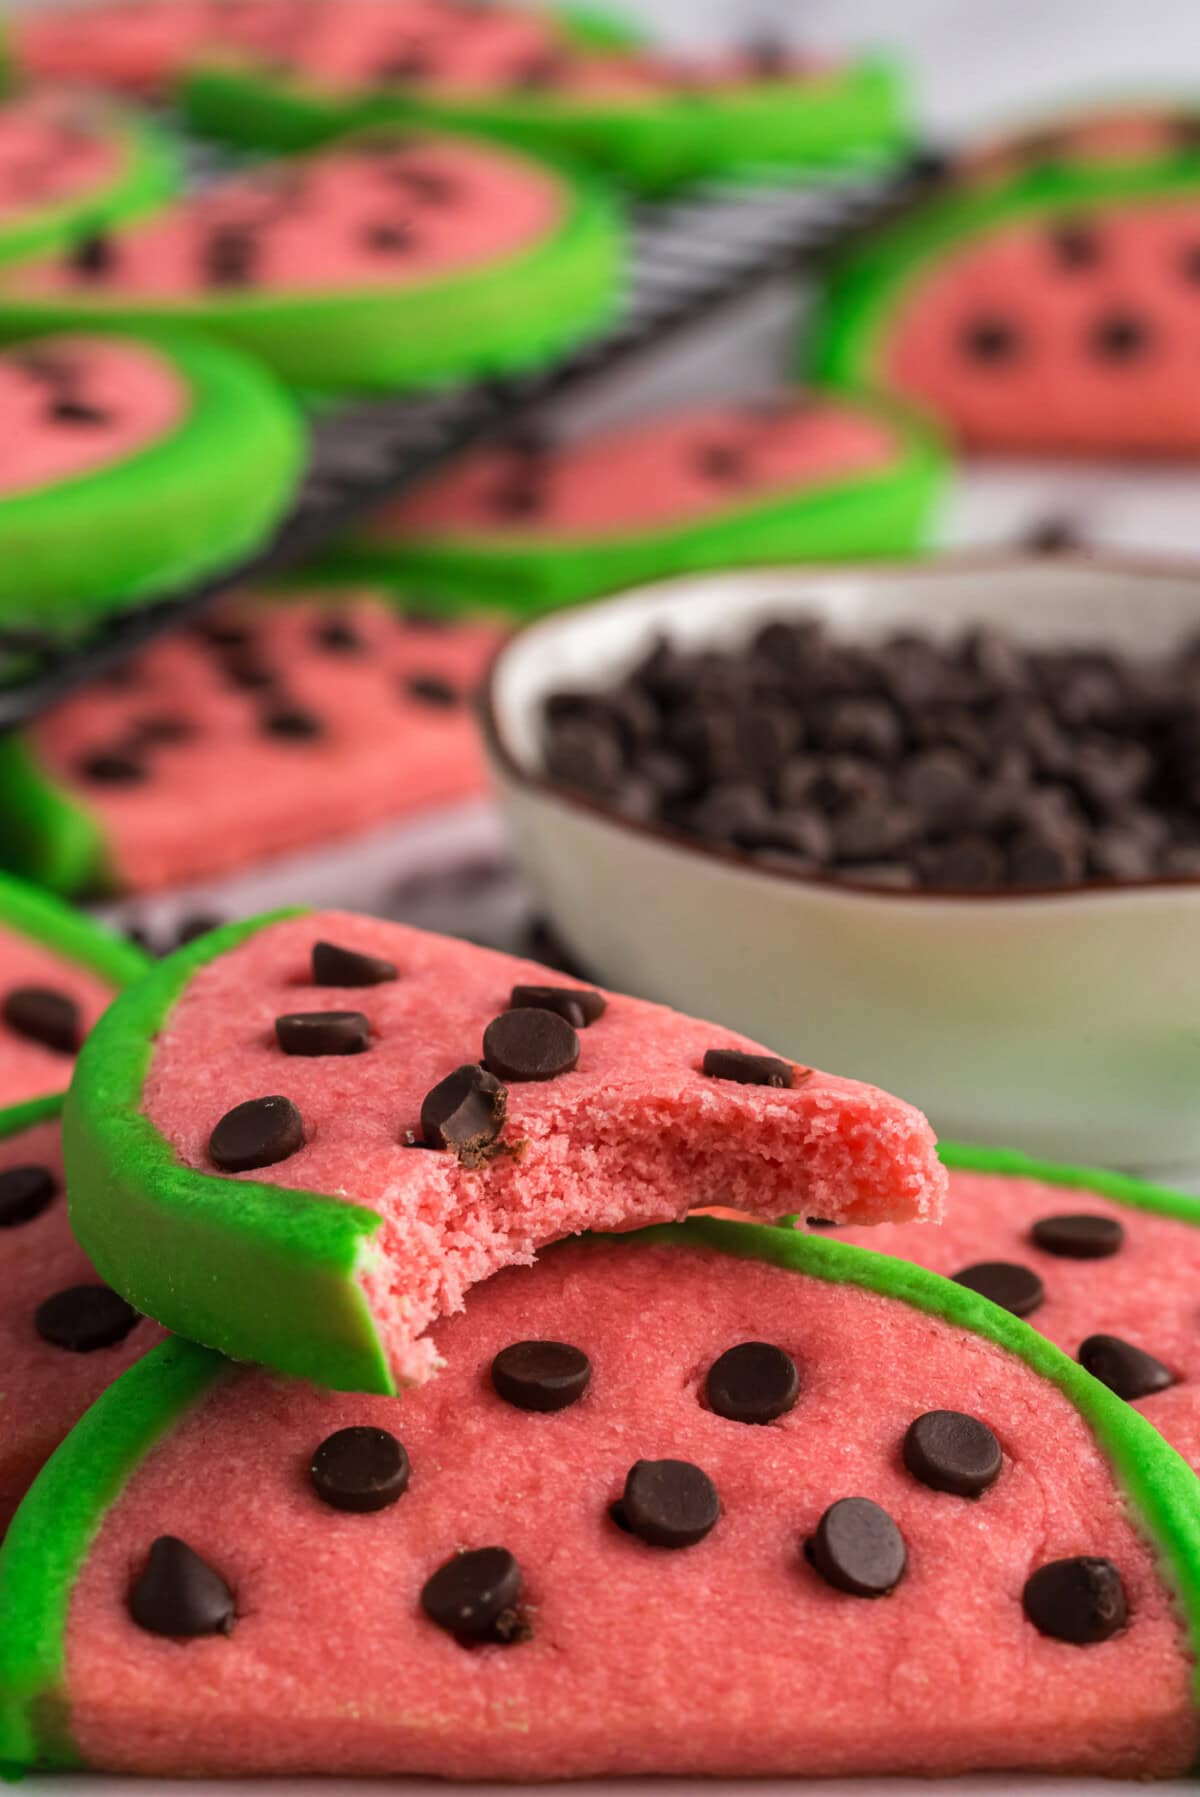
Watermelon cookies are a fun and colorful dessert for summer picnics and cookouts. A sweet sugar cookie base is dipped and rolled in tinted glaze while a few mini chocolate chips resemble the seeds of a watermelon. Though these cookies don’t taste like watermelon, they do look like cute miniature slices. They never last long on the dessert table, that’s for sure!
Ingredients you will need
Get all measurements, ingredients, and instructions in the printable version at the end of this post.
Ingredient Info and Substitution Suggestions
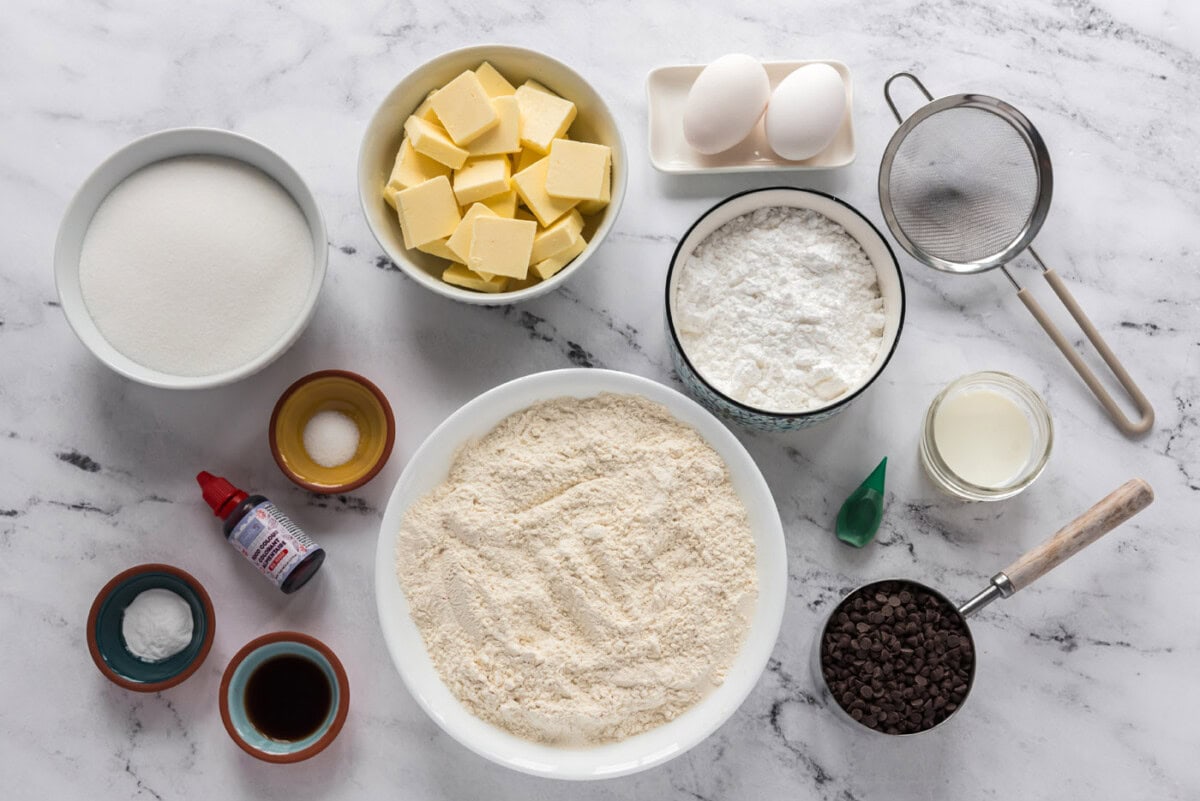
COOKIE – Flour, baking powder, salt, unsalted butter, sugar, eggs, and vanilla extract are what you will need to make the classic sugar cookie dough. A touch of red food coloring will tint the dough a subtle pink color to mimic watermelon.
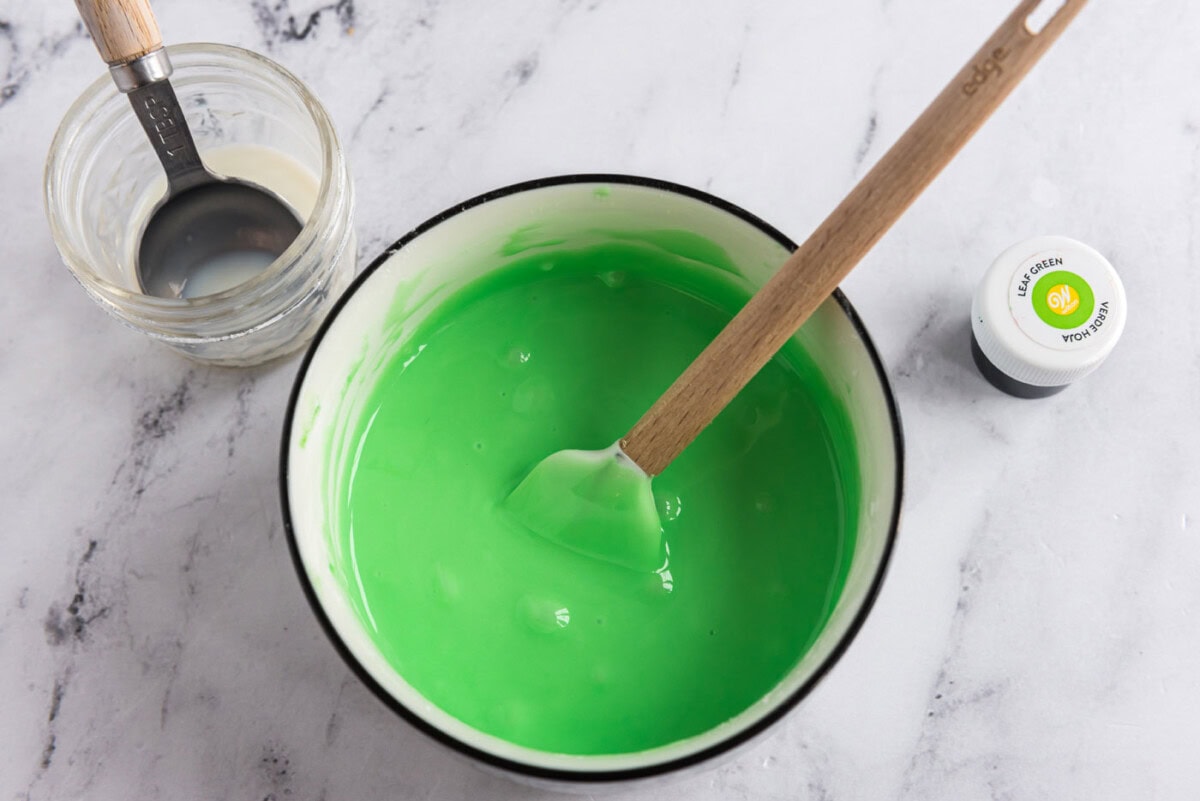
GLAZE – The glaze is a simple combination of powdered sugar, milk, and food coloring. I prefer to use paste gel food coloring as the colors are more vibrant, but liquid food coloring will also do the trick – you may just need to use a bit more to achieve a bright color.
How to Make Watermelon Cookies
These step by step photos and instructions are here to help you visualize how to make this recipe. You can Jump to Recipe to get the printable version of this recipe, complete with measurements and instructions at the bottom.
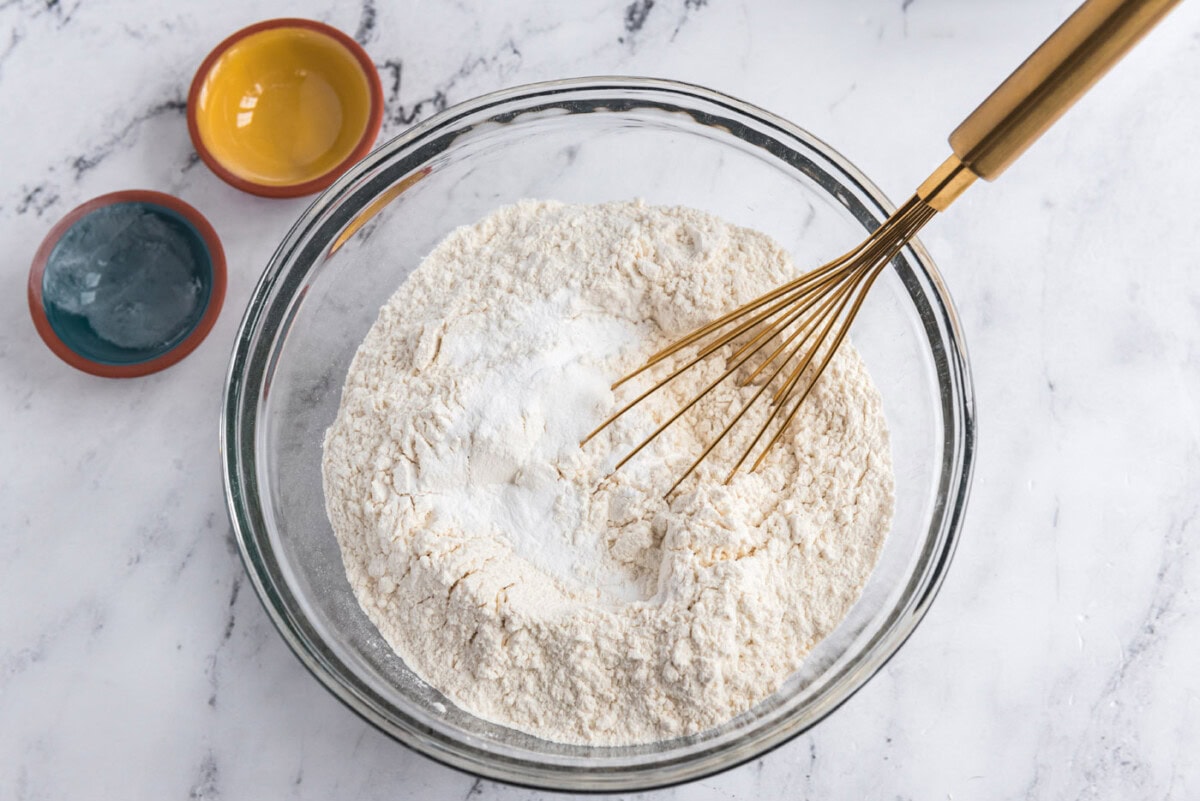
- In a medium bowl, whisk together flour, baking powder, and salt. Set aside.
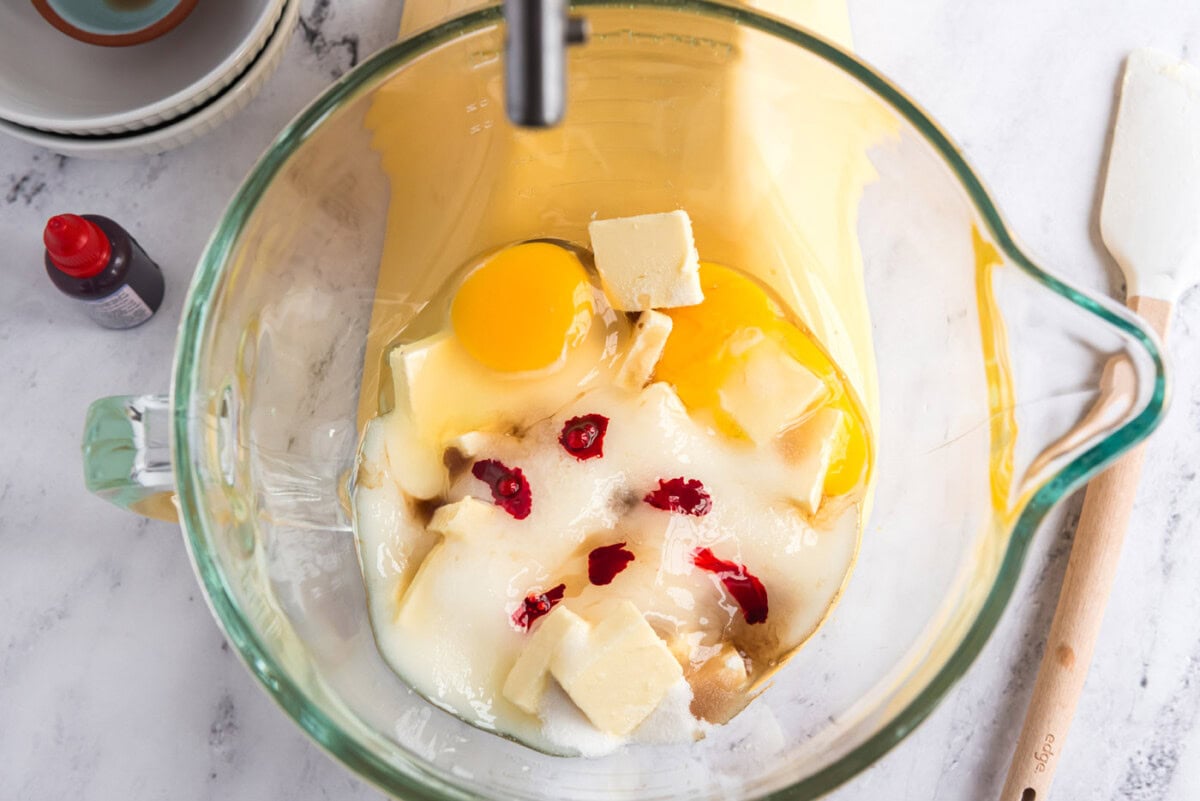
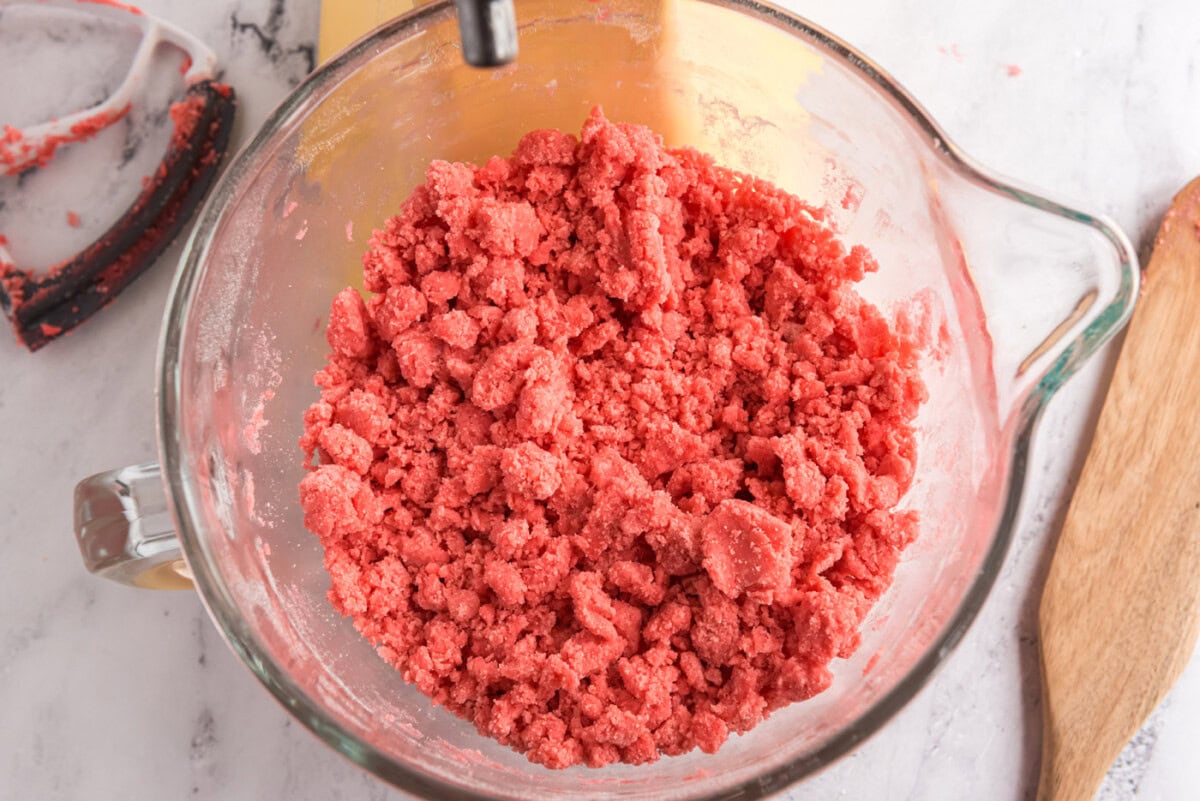
- Add butter slices, sugar, eggs, vanilla, and red food coloring to your mixer’s bowl. Beat on medium speed until incorporated. Don’t be concerned if there are small lumps of butter still visible. Turn mixer down to low and gradually add flour mixture. Mix until incorporated and no traces of flour are left. Gather all the dough together using a sturdy rubber spatula.
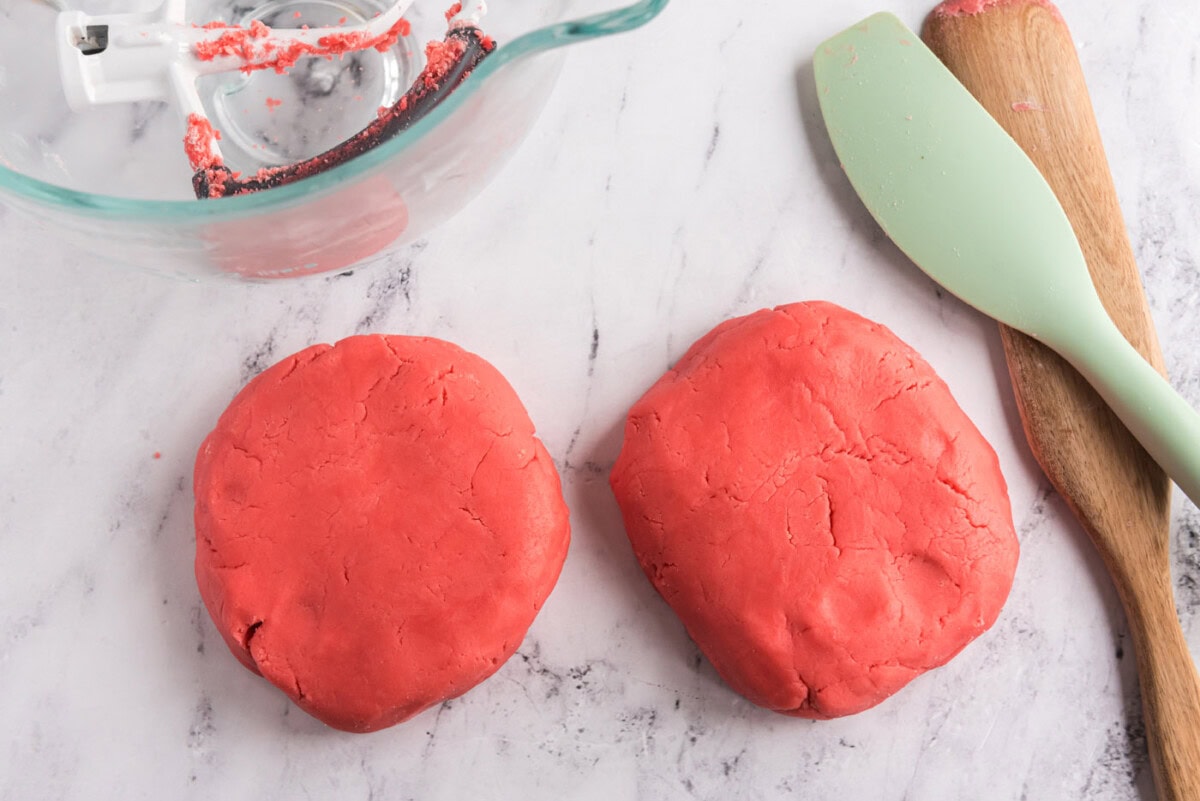
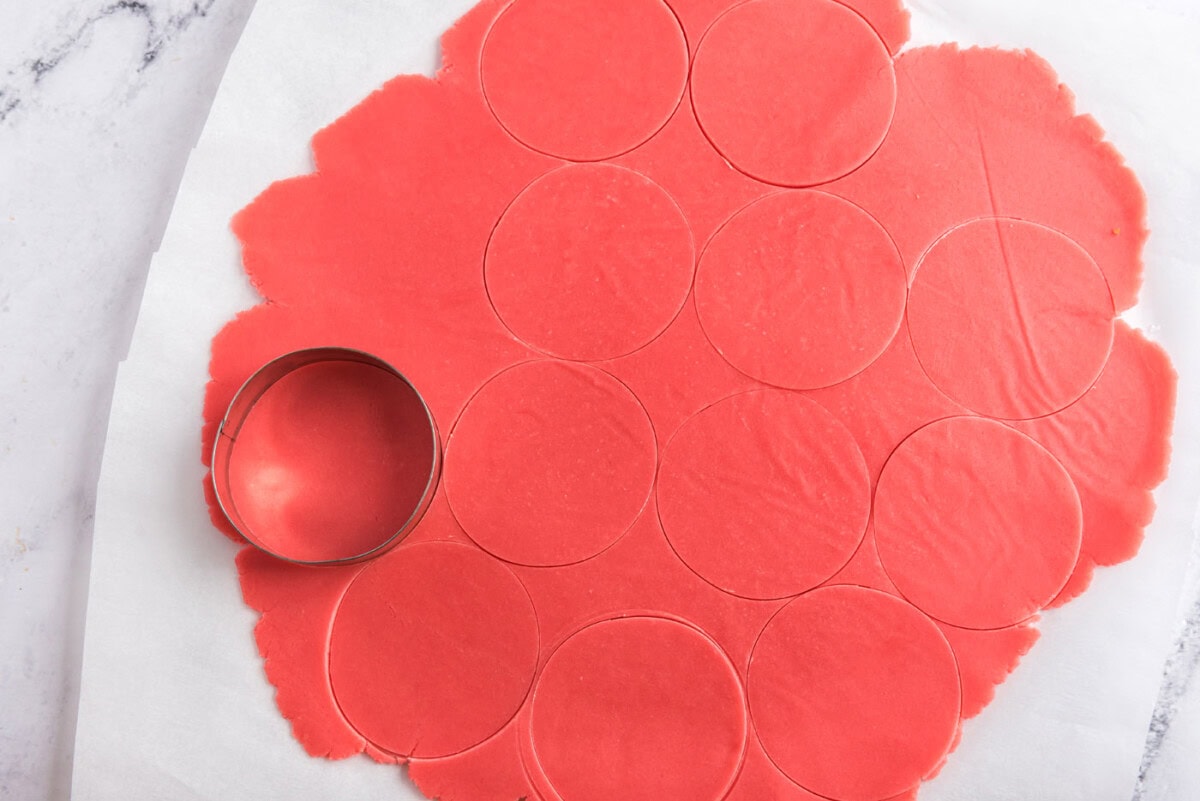
- Remove cookie dough from bowl and separate into two batches. Place one batch between 2 sheets of parchment paper and roll out to about 1/4″ thick. Repeat with the other batch. Chill in the refrigerator for two hours.
- Preheat oven to 400 degrees F and have insulated baking sheets ready.
- Remove one batch of rolled dough from the refrigerator. Cut out circles with a cookie cutter or biscuit cutter.
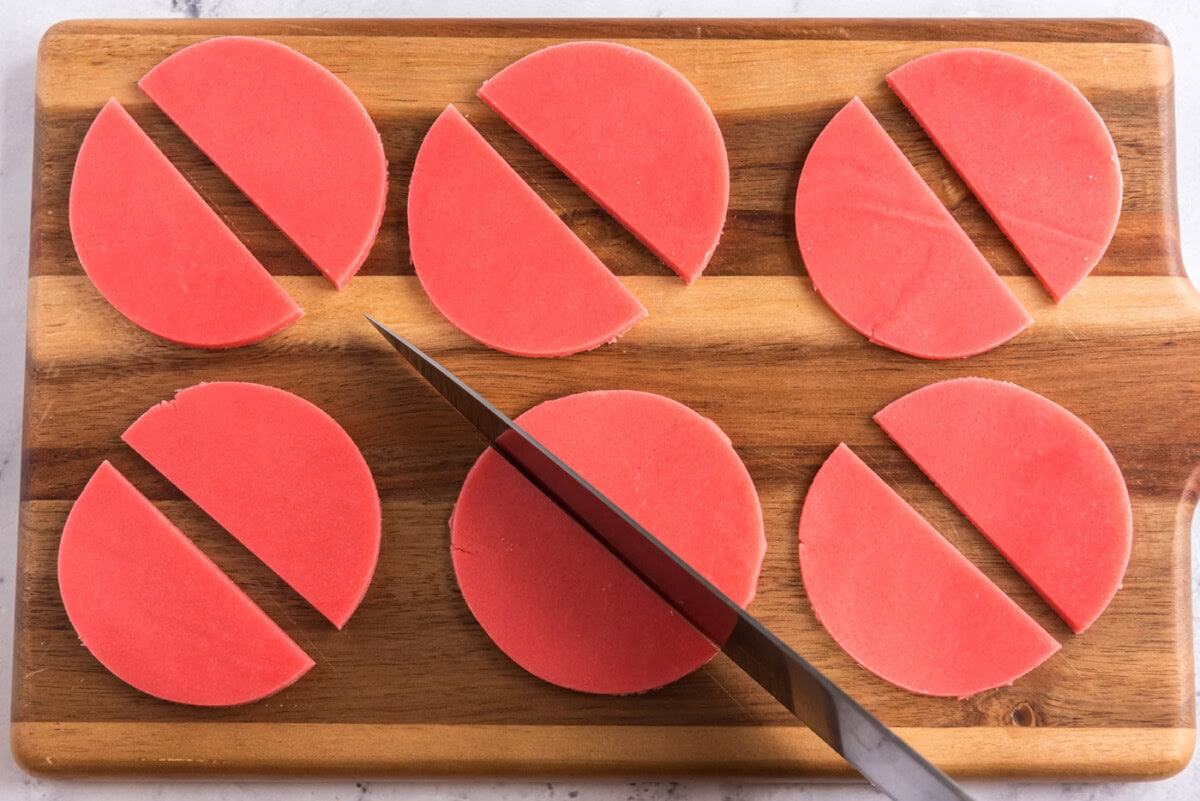
- Use a dough scraper or a sharp knife to cut each circle in half. Place the halves on the baking sheet, about 1″ apart.
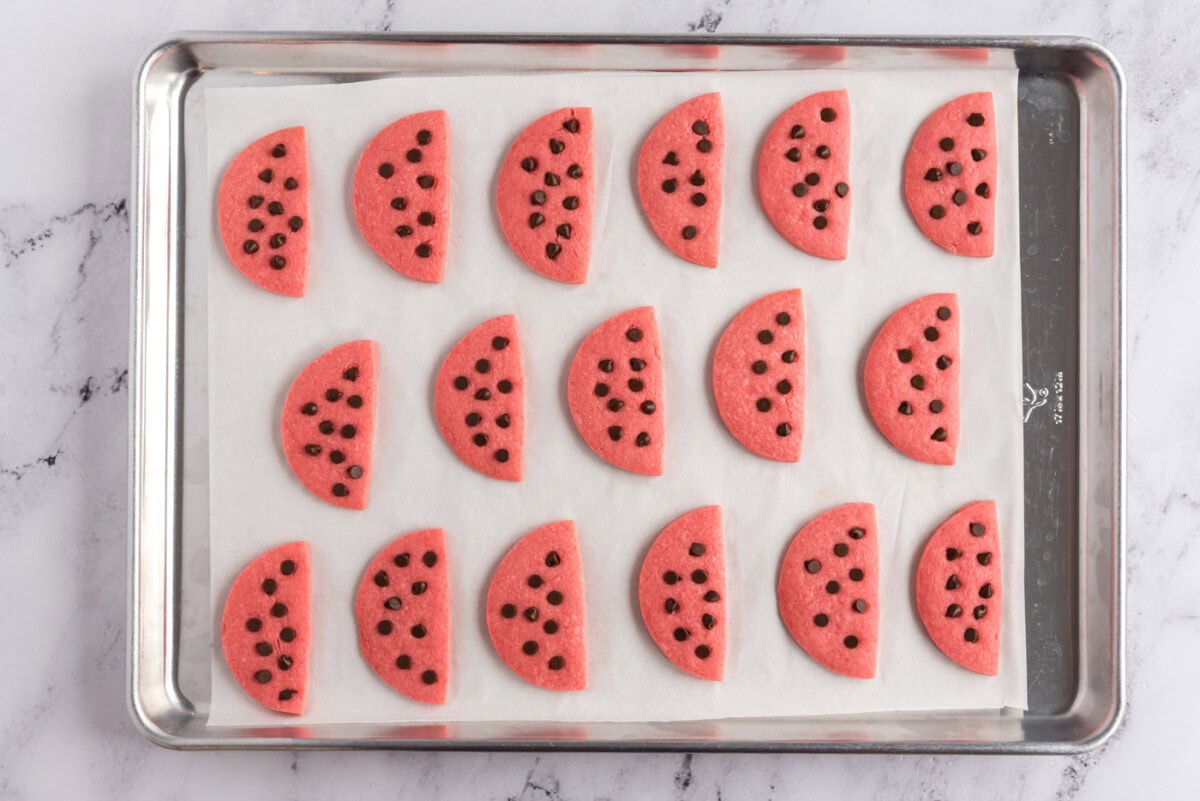
- Gently press miniature semi-sweet morsels into each semicircle.

- Bake for 6-8 minutes, checking after 6 minutes (mine were perfect in 7 minutes). Cookies will be slightly puffed but not browned. Do not allow cookies to get too brown or you’ll have dry crumbly. Remove from oven and allow cookies to cool on baking sheets for 5 minutes. Remove to wire cooling rack and allow to cool completely.
- For each batch of cookie dough, after cutting out the circles, gather the scraps together and reroll them, place back in the refrigerator. Repeat until all dough has been used.
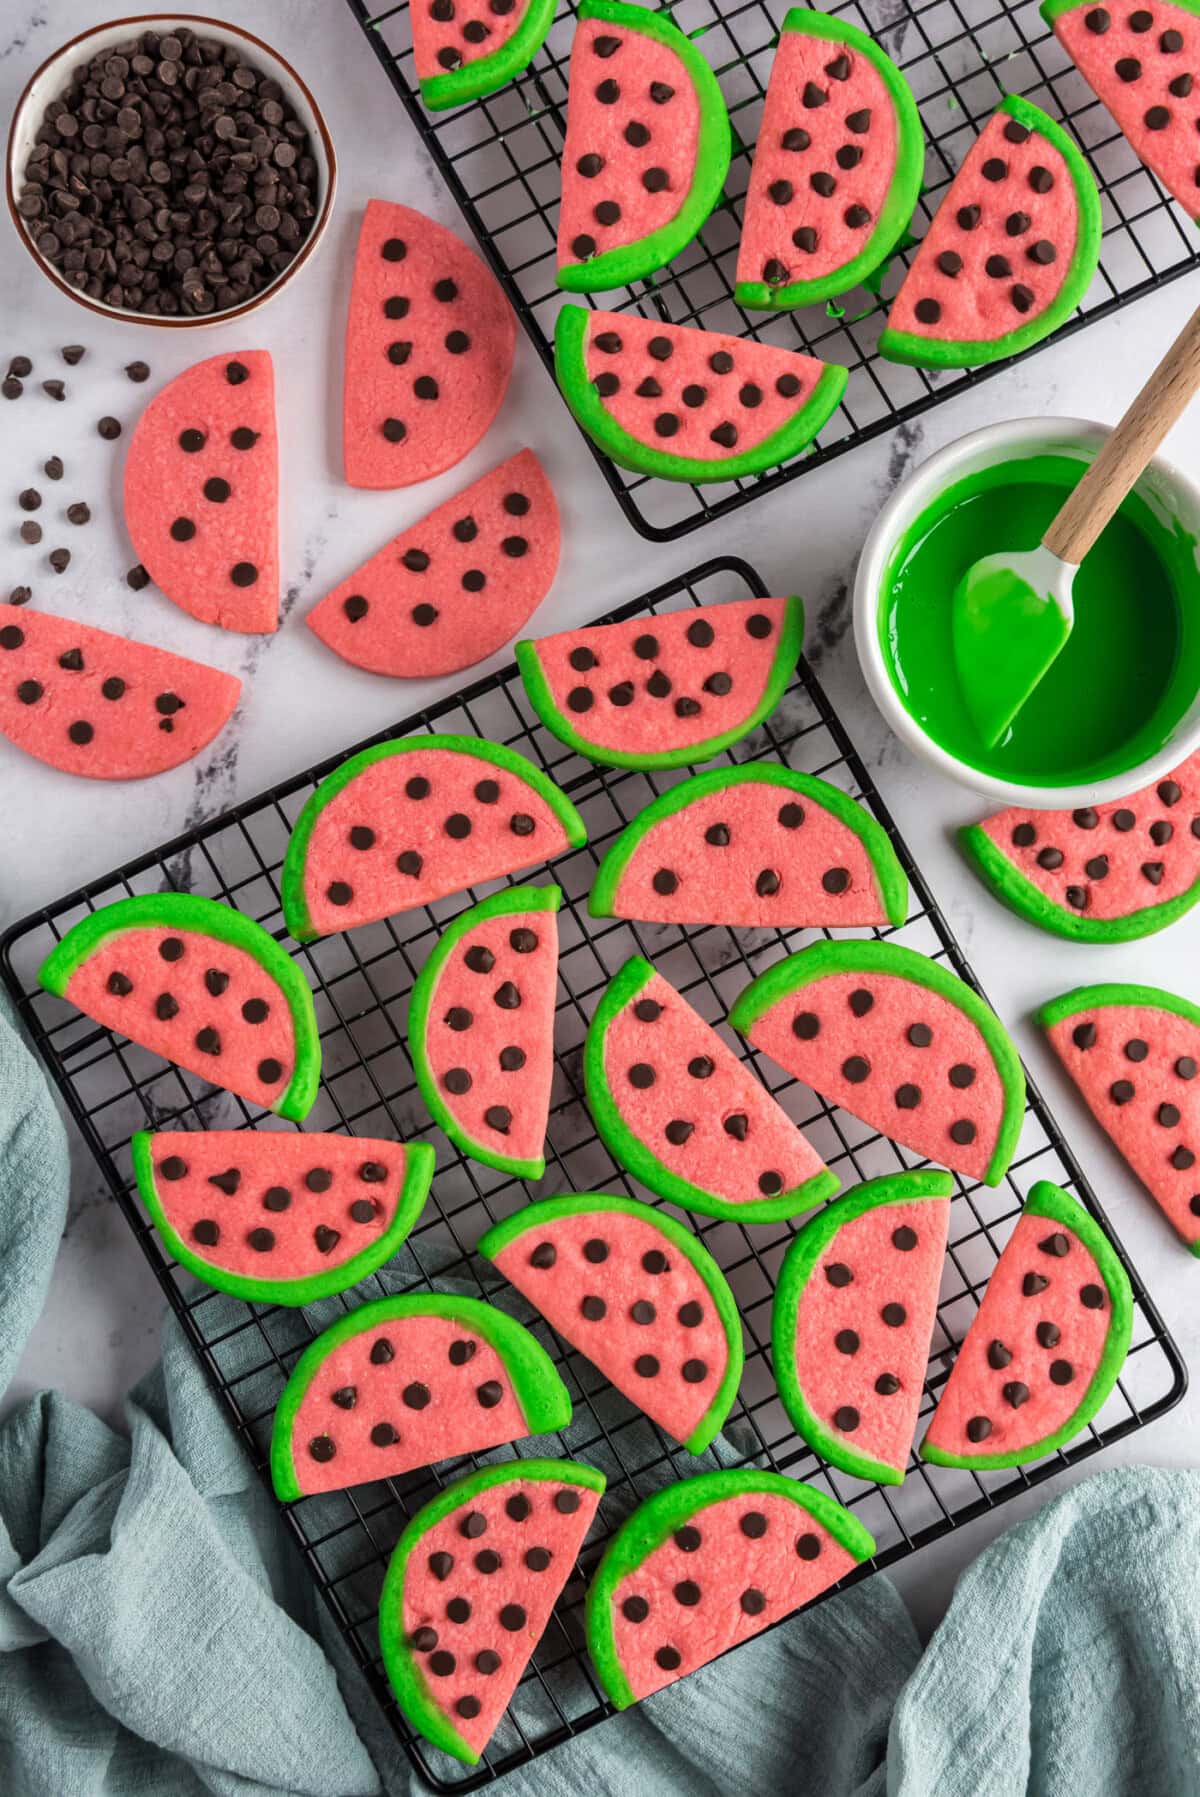
Glazing the Watermelon Cookies
- In a small bowl, mix together all ingredients to form a glaze. You may add drops of milk to thin glaze if it is too thick.
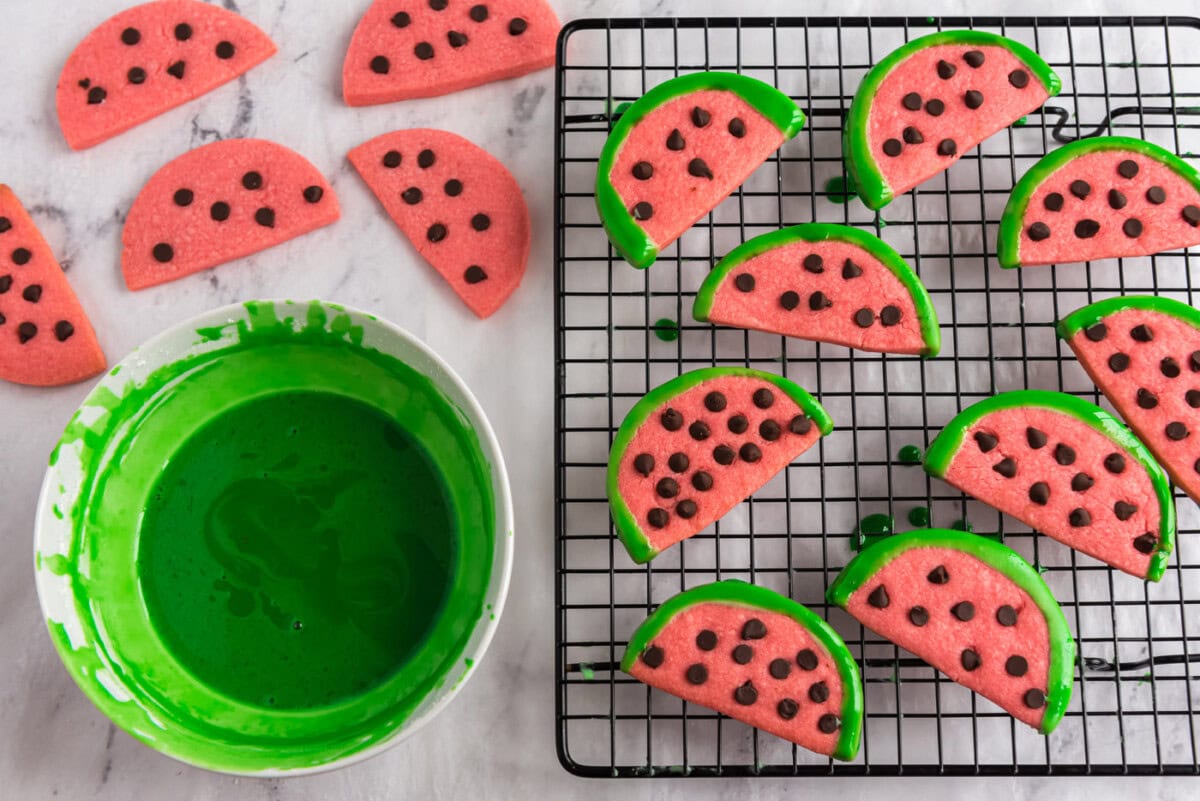
- Cover counter with wax paper and place cooling racks over the wax paper to catch drips. To decorate the cookies, roll the round end of the cookie in the glaze and allow excess to drip off into bowl.
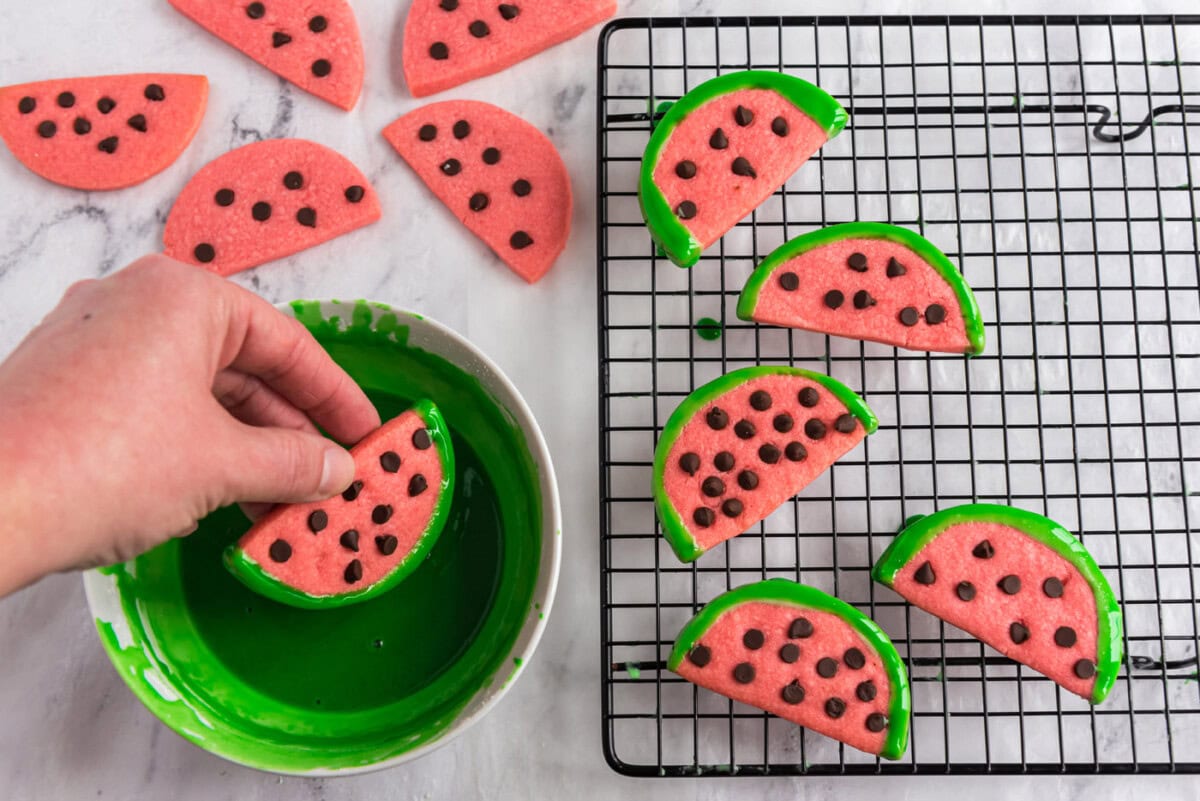
- Place watermelon cookies on cooling racks, excess glaze will drip through onto the wax paper. Wait for glaze to set before moving the cookies.
Frequently Asked Questions & Expert Tips
These cookies only look like watermelon slices, they do not taste like them. If you want to experiment, they make watermelon extract that you can easily substitute the vanilla for – though I have not tried it myself!
Yes, you can easily prepare the cookies, glaze included, a day or two in advance and store them in an air-tight container at room temperature until ready to serve.
You can freeze the cookie dough for future use. Simply wrap the dough ball in plastic wrap and place it inside a gallon-sized zipper bag. Freeze for up to 2 months. Let the dough soften a bit until it’s pliable and begin rolling it out between parchment paper to cut shapes from.
Store your watermelon cookies in an air-tight container kept at room temperature for 3-4 days.
Serving Suggestions
If there’s one fruit that screams sweet summertime, it’s watermelon. Serve these cute watermelon cookies at potlucks or whip them together for a family baking session with the kids. Pair with a tall glass of cold milk and enjoy!
More Related Recipes
I love to bake and cook and share my kitchen experience with all of you! Remembering to come back each day can be tough, that’s why I offer a convenient newsletter every time a new recipe posts. Simply subscribe and start receiving your free daily recipes!

Watermelon Cookies
IMPORTANT – There are often Frequently Asked Questions within the blog post that you may find helpful. Simply scroll back up to read them!
Print It Pin It Rate ItIngredients
Sugar Cookie Dough
- 3 ¾ cups all purpose flour
- 1 teaspoon baking powder
- ½ teaspoon salt
- 1 cup cold unsalted butter cut into 1/2 tablespoon slices
- 1 ½ cups granulated sugar
- 2 eggs
- 2 teaspoon vanilla extract
- 6 drops red food coloring
Plus
- 1 cup miniature semi sweet morsels
Glaze
- 1 ½ cups powdered sugar sifted
- 2-3 tablespoons milk
- green paste food coloring OR 15-20 drops green food coloring
Things You’ll Need
- Stand mixer or hand mixer
Before You Begin
- *Note: Insulated baking sheets are best for baking sugar cookies. If you only have regular cookie sheets, line them with parchment or a silicon baking mat.
- This recipe should yield anywhere from 36-52 cookies depending on the size of your cookie cutter.
Instructions
- In a medium bowl, whisk together flour, baking powder, and salt. Set aside.
- Add butter slices, sugar, eggs, vanilla, and red food coloring to your mixer's bowl. Beat on medium speed until incorporated. Don't be concerned if there are small lumps of butter still visible.
- Turn mixer down to low and gradually add flour mixture. Mix until incorporated and no traces of flour are left. Gather all the dough together using a sturdy rubber spatula.
- Remove dough from bowl and separate into two batches. Place one batch between 2 sheets of parchment paper and roll out to about 1/4" thick. Repeat with the other batch. Chill in the refrigerator for two hours.
- Preheat oven to 400 degrees F and have insulated baking sheets ready.
- Remove one batch of rolled dough from the refrigerator. Cut out circles with a cookie cutter or biscuit cutter.
- Use a dough scraper or a sharp knife to cut each circle in half. Place the halves on the baking sheet, about 1" apart.
- Gently press miniature semi sweet morsels into each semicircle.
- Bake for 6-8 minutes, checking after 6 minutes (mine were perfect in 7 minutes). Cookies will be slightly puffed but not browned. Do not allow cookies to get too brown or you'll have dry crumbly cookies. Remove from oven and allow cookies to cool on baking sheets for 5 minutes. Remove to wire cooling rack and allow to cool completely.
- For each batch of cookie dough, after cutting out the circles, gather the scraps together and reroll them, place back in the refrigerator. Repeat until all dough has been used.
For the Glaze
- In a small bowl, mix together all ingredients to form a glaze. You may add drops of milk to thin glaze if it is too thick.
- Cover counter with wax paper and place cooling racks over the wax paper to catch drips. To decorate the cookies, roll the round end of the cookie in the glaze, allow excess to drip off into bowl.
- Place cookies on cooling racks, excess glaze will drip through onto the wax paper. Wait for glaze to set before moving the cookies.
Expert Tips & FAQs
- Store your watermelon cookies in an air-tight container kept at room temperature for 3-4 days.
- Freezing – You can freeze the cookie dough for future use. Simply wrap the dough balls in plastic wrap and place it inside a gallon-sized zipper bag. Freeze for up to 2 months. Let the dough soften a bit until it’s pliable and begin rolling it out between parchment paper to cut shapes from.
Nutrition
The recipes on this blog are tested with a conventional gas oven and gas stovetop. It’s important to note that some ovens, especially as they age, can cook and bake inconsistently. Using an inexpensive oven thermometer can assure you that your oven is truly heating to the proper temperature. If you use a toaster oven or countertop oven, please keep in mind that they may not distribute heat the same as a conventional full sized oven and you may need to adjust your cooking/baking times. In the case of recipes made with a pressure cooker, air fryer, slow cooker, or other appliance, a link to the appliances we use is listed within each respective recipe. For baking recipes where measurements are given by weight, please note that results may not be the same if cups are used instead, and we can’t guarantee success with that method.
This post originally appeared here on May 29, 2010 and has since been updated with new photos and expert tips.

- Pineapple Salsa - July 16, 2026
- 26 Best Ground Beef Casseroles for Easy Family Dinners - July 8, 2026
- Strawberry Shortcake Kabobs - July 2, 2026


Lanie Ree says
And I featured this too!
http://lanieree.blogspot.com/2010/06/featuring-you.html
the lovely paper blog says
i love those!! so cute and i must make them! thanks for the idea:)
Cheryl says
Ahhhhh – These are so cute!! Stopping by from Fun To Craft. Would love for you to link your projects to my next Craftastic Monday party:)
jennoreilly says
SO adorable!!! I hopped over from TidyMom, I'm going to check out the caddy next!!!
Lanie Ree says
Oh heck yes! I love both of your blogs so much.
Thank you for participating in the Craft Therapy Session with Life in the Pitts
creativejewishmom says
Amazing Amanda! thanks for sharing on Craft Schooling Sunday….great to have you, thanks so much for being a regular, I really appreciate it!
Brianna! says
Oh my goodness
these are absolutely precious
and I want to make them NOW
and have a picnic!!
thanks for sharing!
xoxo
bB
Megan says
Cute! Almost too cute to eat. I'm saving this recipe so my daughter and I can make these for the next family gathering…thanks for sharing!
5 Star Foodie says
Wow, such beauties! They look truly amazing!
anne maskell says
you have such great ideas! I absolutely love your blog, and I'm your newest follower! I followed you home from somewhat simple.
Helby says
This is adorable! I'm definitely making these. Happy summer!
Donene says
These are adorable and look so summery! I think I will have to try these!
Amanda says
Oh I just realized what you probably though was wasted. Did you think that the scraps of dough that were missed by the cookie cutter were wasted? They weren't. Reroll, refrigerate, recut. I even used the very last bit and formed it into a circle.
Amanda says
Anonymous – easier, maybe :) but definitely not as pretty. :) As for less waste, that comment confuses me. I had no waste with this recipe. What were you referring to?
Anonymous says
it would be so much easier to roll the dough into a log and glaze it, then slice into little watermelon rounds and cut those in half… less waste, more cookies :D or you could wrap around a layer of green cookie dough before slicing
Jennifer Juniper says
THese are so cute! Perfect for a picnic :)
Kara@ Creations by Kara says
I love this idea. All the others I've seen are wrapped in green dough to make the rind. This looks so much easier. Thanks for sharing!
Julie @ Willow Bird Baking says
These are just adorable!!
cookies and cups says
These cookies are so great!!!
Suzy says
Definitely "too cute". My hubby hates watermelon but he might eat these!