
These Conversation Heart Brownies are a rich, chocolatey mess of goodness with all of the cuteness of the classic Valentine candies, making them the perfect easy Valentine’s dessert. I really wanted to do something cute with Conversation Hearts this Valentine’s Day – but I really didn’t want to eat chalky tasteless Conversation Hearts.

Conversation Heart Brownies Recipe
For these easy Conversation Heart Brownies, I used my classic brown butter brownie recipe for this conversation heart brownie, although my 3-ingredient brownies would be a great time saver.
You can substitute your own favorite brownie recipe for ours – though I think it’s pretty fantastic. The focus here is making them look like little candies, which is a fun touch but trickier if you’re making these with kids as I did. The nice part is that you can play off the original conversation heart idea yet you have the freedom to choose the quotes and colors which can make these brownies an even more special treat!

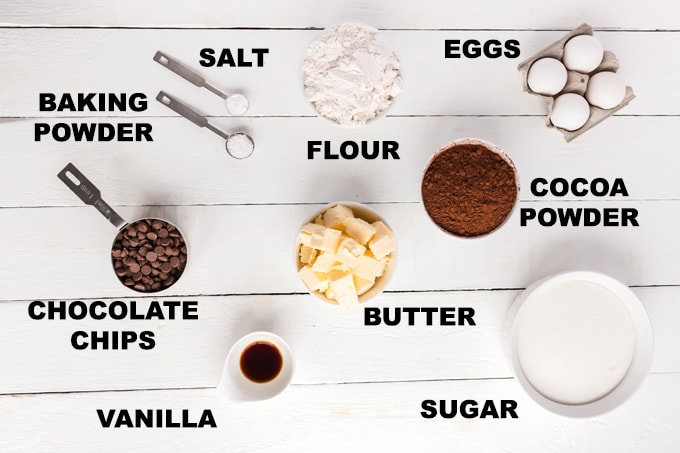
Ingredients for Conversation Heart Brownies
- 1 1/3 cup butter
- 2 1/2 cups white sugar
- 1 1/2 cup cocoa powder
- 1 teaspoon salt
- 1/2 teaspoon baking powder
- 4 large eggs
- 2 teaspoons vanilla extract
- 1 1/3 cup flour
- 1 cup milk chocolate chips2 1/2 cups vanilla or white frosting
- food coloring
Kitchen Tools You May Find Helpful
- 10×10 baking pan
- Medium saucepan
- 3-4 microwave-safe bowls
- Whisk or wooden spoon
- Measuring cups and spoons
- Piping bag
- Spoons
Baking Tips
- I baked the brownies in a 10″x10″ square pan and cut them out with a heart-shaped cookie cutter after cooling.
- If you don’t have a 10×10, you can use a 9″x9″ pan, but you may need to increase the bake time a little as the brownies will be thicker.
How to Make Conversation Heart Brownies
- Preheat oven to 325 degrees F.
- Grease or spray a 10×10 baking pan.
- In a small bowl, sift together the cocoa powder, salt and baking powder. Set aside.
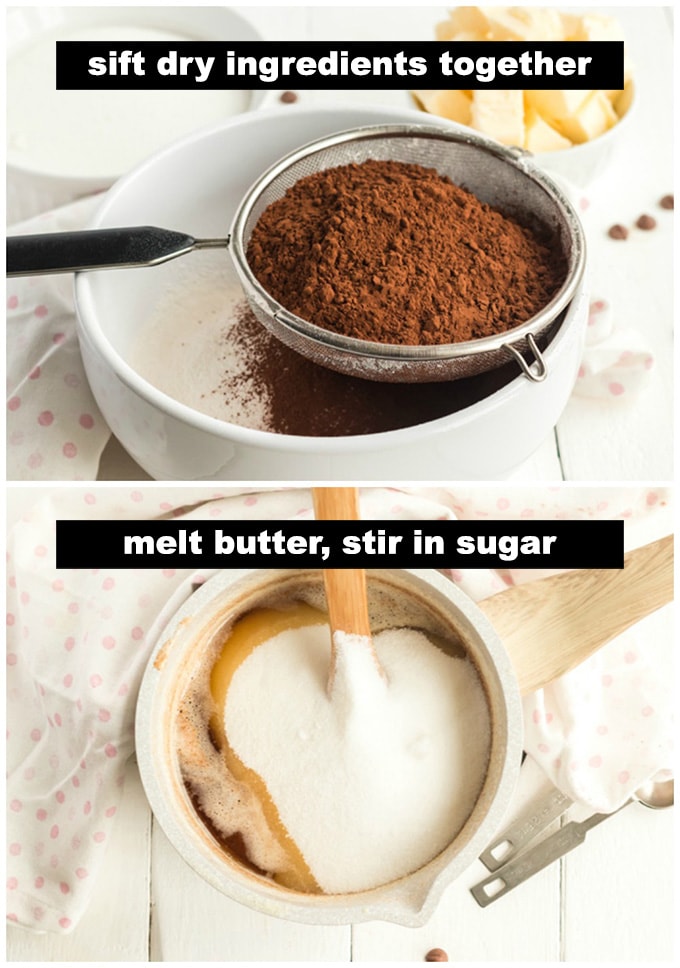
- Place the butter in a small saucepan over medium heat and cook for 8-10 minutes until slightly golden brown. Small pieces of milk fat will turn a chocolate brown and that’s okay. Remove the pan from the stove and immediately stir in the white sugar with a wooden spoon.
- Add in the cocoa mixture and then allow to cool to room temperature, about 5-8 minutes.

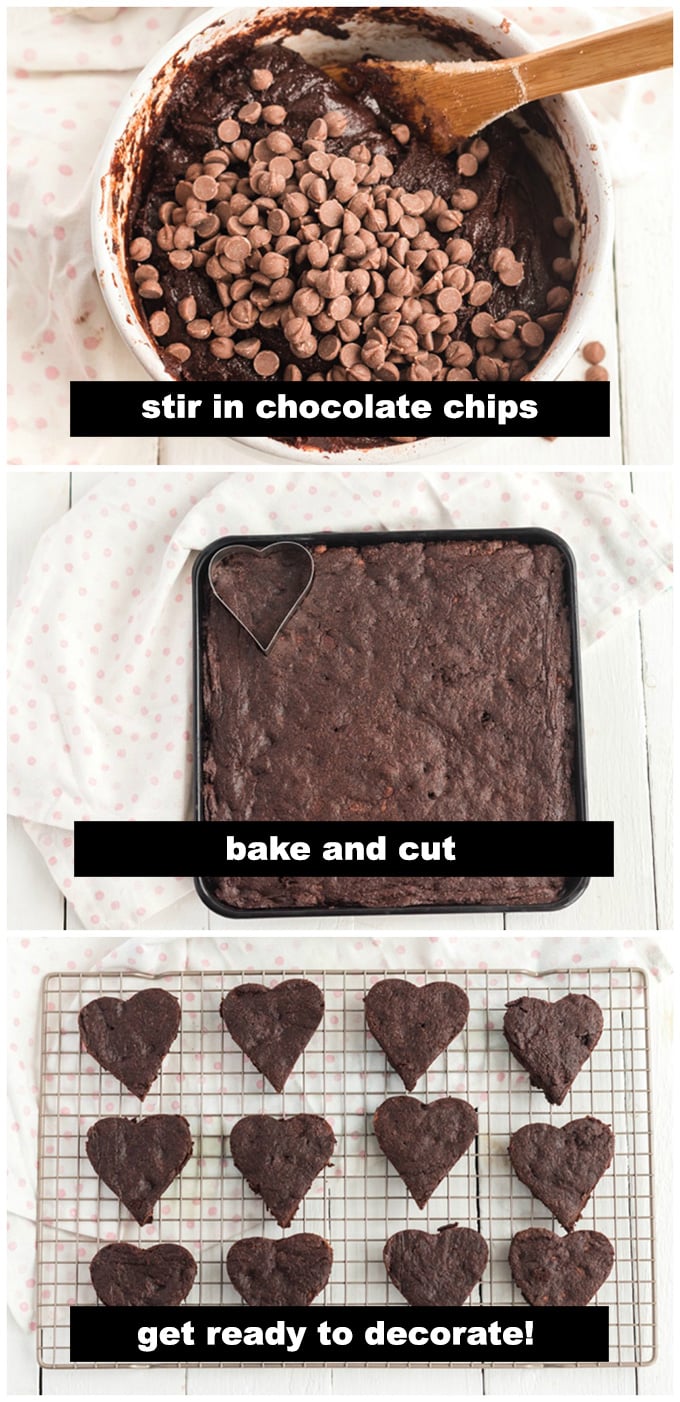
- Add in the eggs one at a time, then the vanilla and flour, beating thoroughly after each addition. Beat for 2 minutes before adding in the chocolate chips.
- Pour/spread the brownie batter into the baking pan and bake for 22-25 minutes, until an inserted toothpick comes out clean and tops are cracked. Allow brownies to cool in the pan to avoid breaking. Ue a heart shaped cookie cutter to get as many brownies from the pan as you can.
- Place 1/2 cup of frosting into 5 separate bowls. Add one drop of food coloring to each bowl, depending on the color you want. For the red piping color, you will need about 6 drops of food coloring. If you prefer, you can leave the piping frosting white.
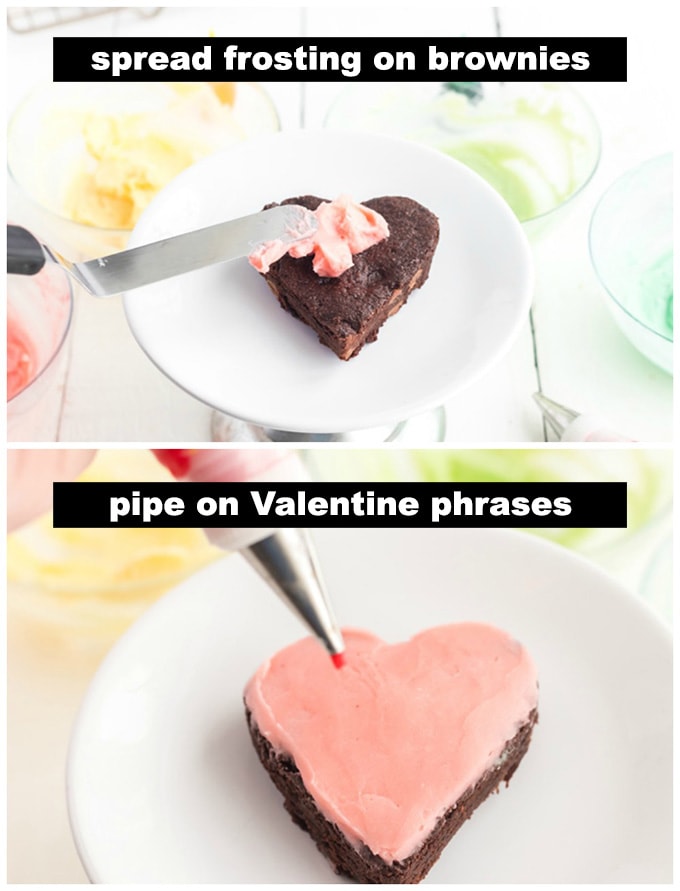
- Roughly frost each brownie with desired color and refrigerate for about 10-15 minutes.
- After they have set, use an offset spatula dipped in warm water, wiped with a paper towel to smooth tops.
- Fill piping bag or zipper plastic bag with red piping frosting. We used a Wilton #1 tip for piping the words. If using plastic bag, snip a small corner off the bag to pipe.

Adorable, right? These Conversation Heart Brownies would be a cute classroom treat or a special surprise for your friends at the office!
More Valentine’s Day Treat Ideas
- Valentine’s Day Heart Cupcakes
- Valentine Play Dough Cookie Pops
- Heart Oreo Truffles
- Chocolate Covered Strawberries
- Red Velvet Lasagna
- Red Velvet Fudge
- Chocolate Chip Cookies for Two
- Conversation Heart Cookies

Conversation Heart Brownies
IMPORTANT - There are often Frequently Asked Questions within the blog post that you may find helpful. Simply scroll back up to read them!
Print It Rate ItIngredients
- 1 ⅓ cup butter
- 2 ½ cups white sugar
- 1 ½ cup cocoa powder
- 1 teaspoon salt
- ½ teaspoon baking powder
- 4 large eggs
- 2 teaspoons vanilla extract
- 1 ⅓ cup flour
- 2 ½ cups vanilla or white frosting
- food coloring
Before You Begin
- I baked the brownies in a 10"x10" square pan and cut them out with a heart-shaped cookie cutter after cooling.
- If you don't have a 10x10, you can use a 9"x9" pan, but you may need to increase the bake time a little as the brownies will be thicker.
Instructions
- Preheat oven to 325 degrees F.
- Grease or spray a 10x10 baking pan.
- In a small bowl, sift together the cocoa powder, salt and baking powder. Set aside.
- Place the butter in a small saucepan over medium heat and cook for 8-10 minutes until slightly golden brown. Small pieces of milk fat will turn a chocolate brown and that's okay. Remove the pan from the stove and immediately stir in the white sugar with a wooden spoon.
- Add in the cocoa mixture and then allow to cool to room temperature, about 5-8 minutes.
- Add in the eggs one at a time, then the vanilla and flour, beating thoroughly after each addition. Beat for 2 minutes before adding in the chocolate chips.
- Pour/spread the brownie batter into the baking pan and bake for 22-25 minutes, until an inserted toothpick comes out clean and tops are cracked. Allow brownies to cool in the pan to avoid breaking. Ue a heart shaped cookie cutter to get as many brownies from the pan as you can.
- Place 1/2 cup of frosting into 5 separate bowls. Add one drop of food coloring to each bowl, depending on the color you want. For the red piping color, you will need about 6 drops of food coloring. If you prefer, you can leave the piping frosting white.
- Roughly frost each brownie with desired color and refrigerate for about 10-15 minutes.
- After they have set, use an offset spatula dipped in warm water, wiped with a paper towel to smooth tops.
- Fill piping bag or zipper plastic bag with red piping frosting. We used a Wilton #1 tip for piping the words. If using plastic bag, snip a small corner off the bag to pipe.
Nutrition
The recipes on this blog are tested with a conventional gas oven and gas stovetop. It's important to note that some ovens, especially as they age, can cook and bake inconsistently. Using an inexpensive oven thermometer can assure you that your oven is truly heating to the proper temperature. If you use a toaster oven or countertop oven, please keep in mind that they may not distribute heat the same as a conventional full sized oven and you may need to adjust your cooking/baking times. In the case of recipes made with a pressure cooker, air fryer, slow cooker, or other appliance, a link to the appliances we use is listed within each respective recipe. For baking recipes where measurements are given by weight, please note that results may not be the same if cups are used instead, and we can’t guarantee success with that method.
This post originally appeared here on Jan 27, 2017.
- The Right Way to Brown Ground Beef (And Why Most People Don’t) - June 17, 2026
- Blueberry Fool - June 17, 2026
- Strawberry Sangria - May 19, 2026


Leave a Reply