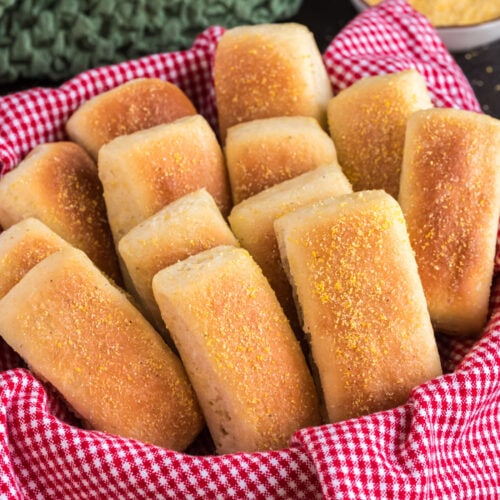
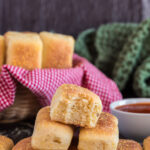
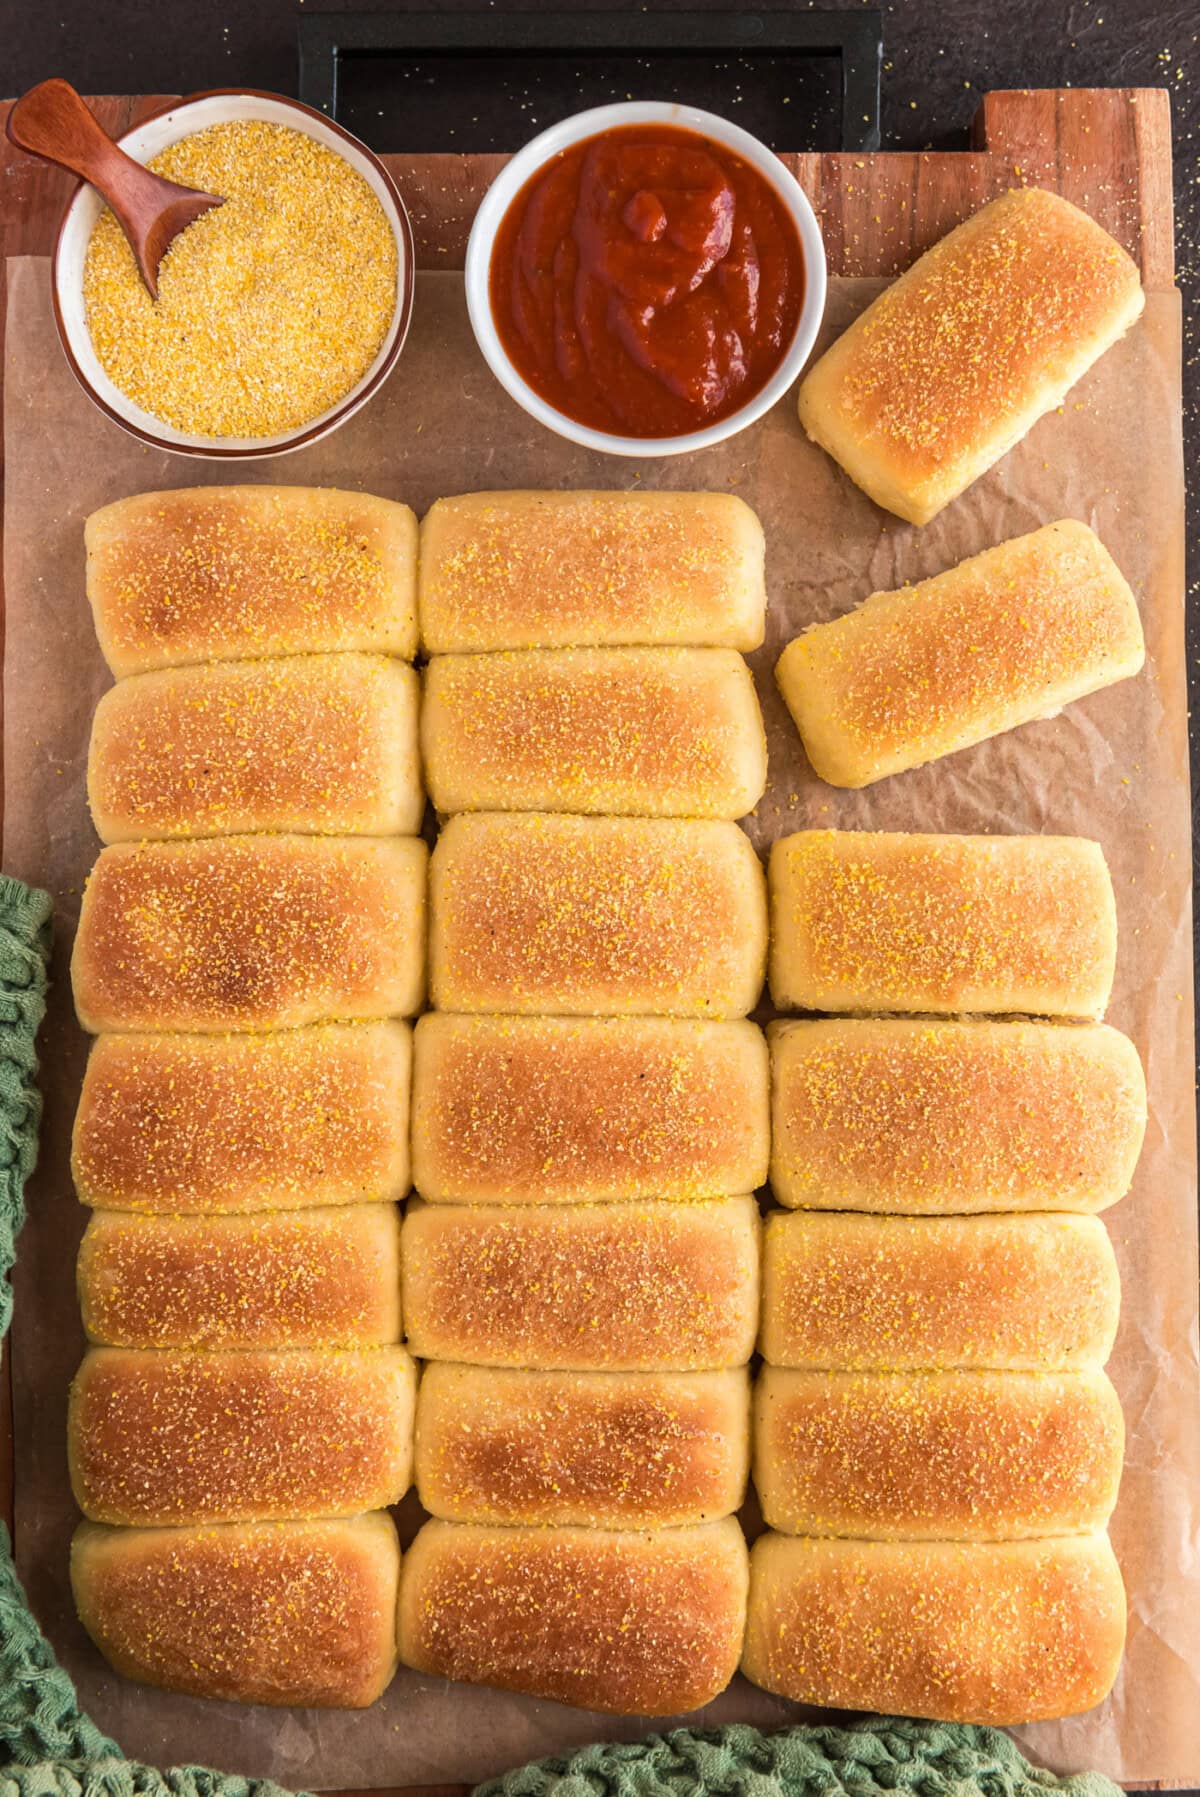
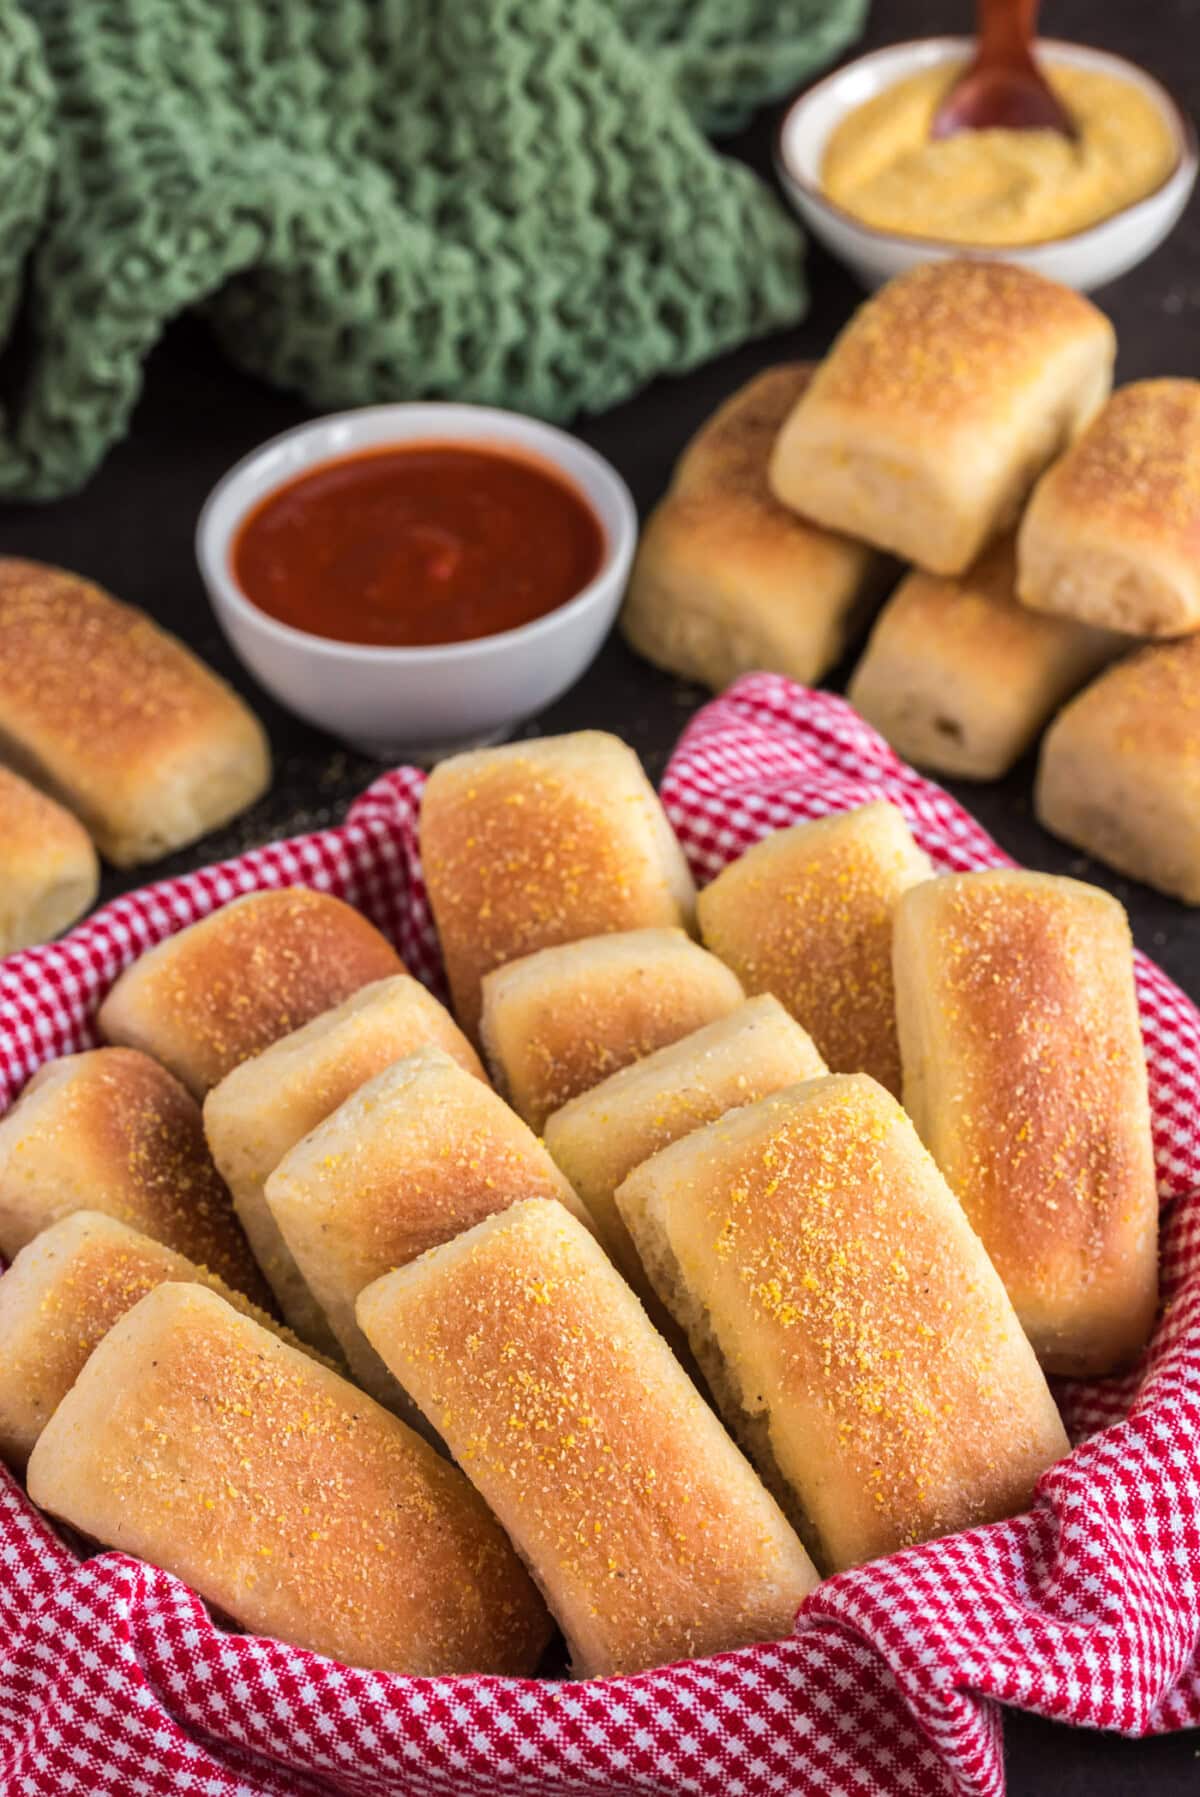
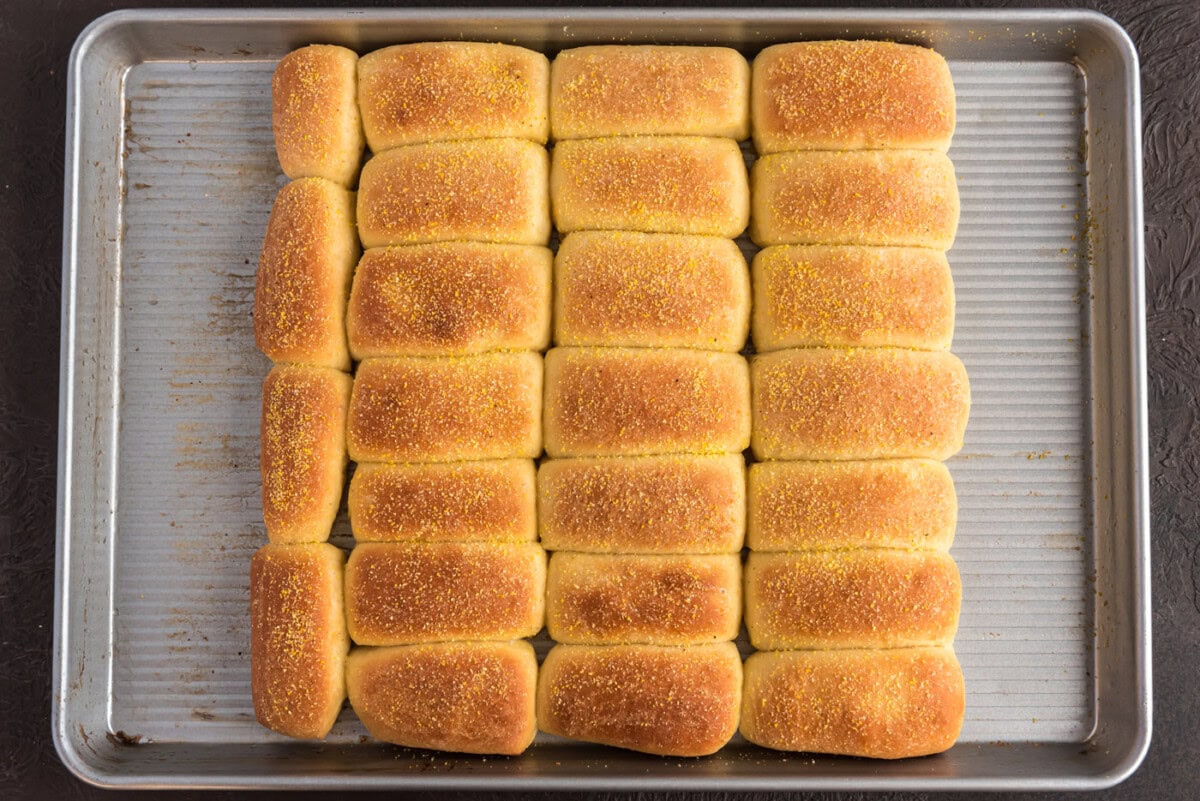
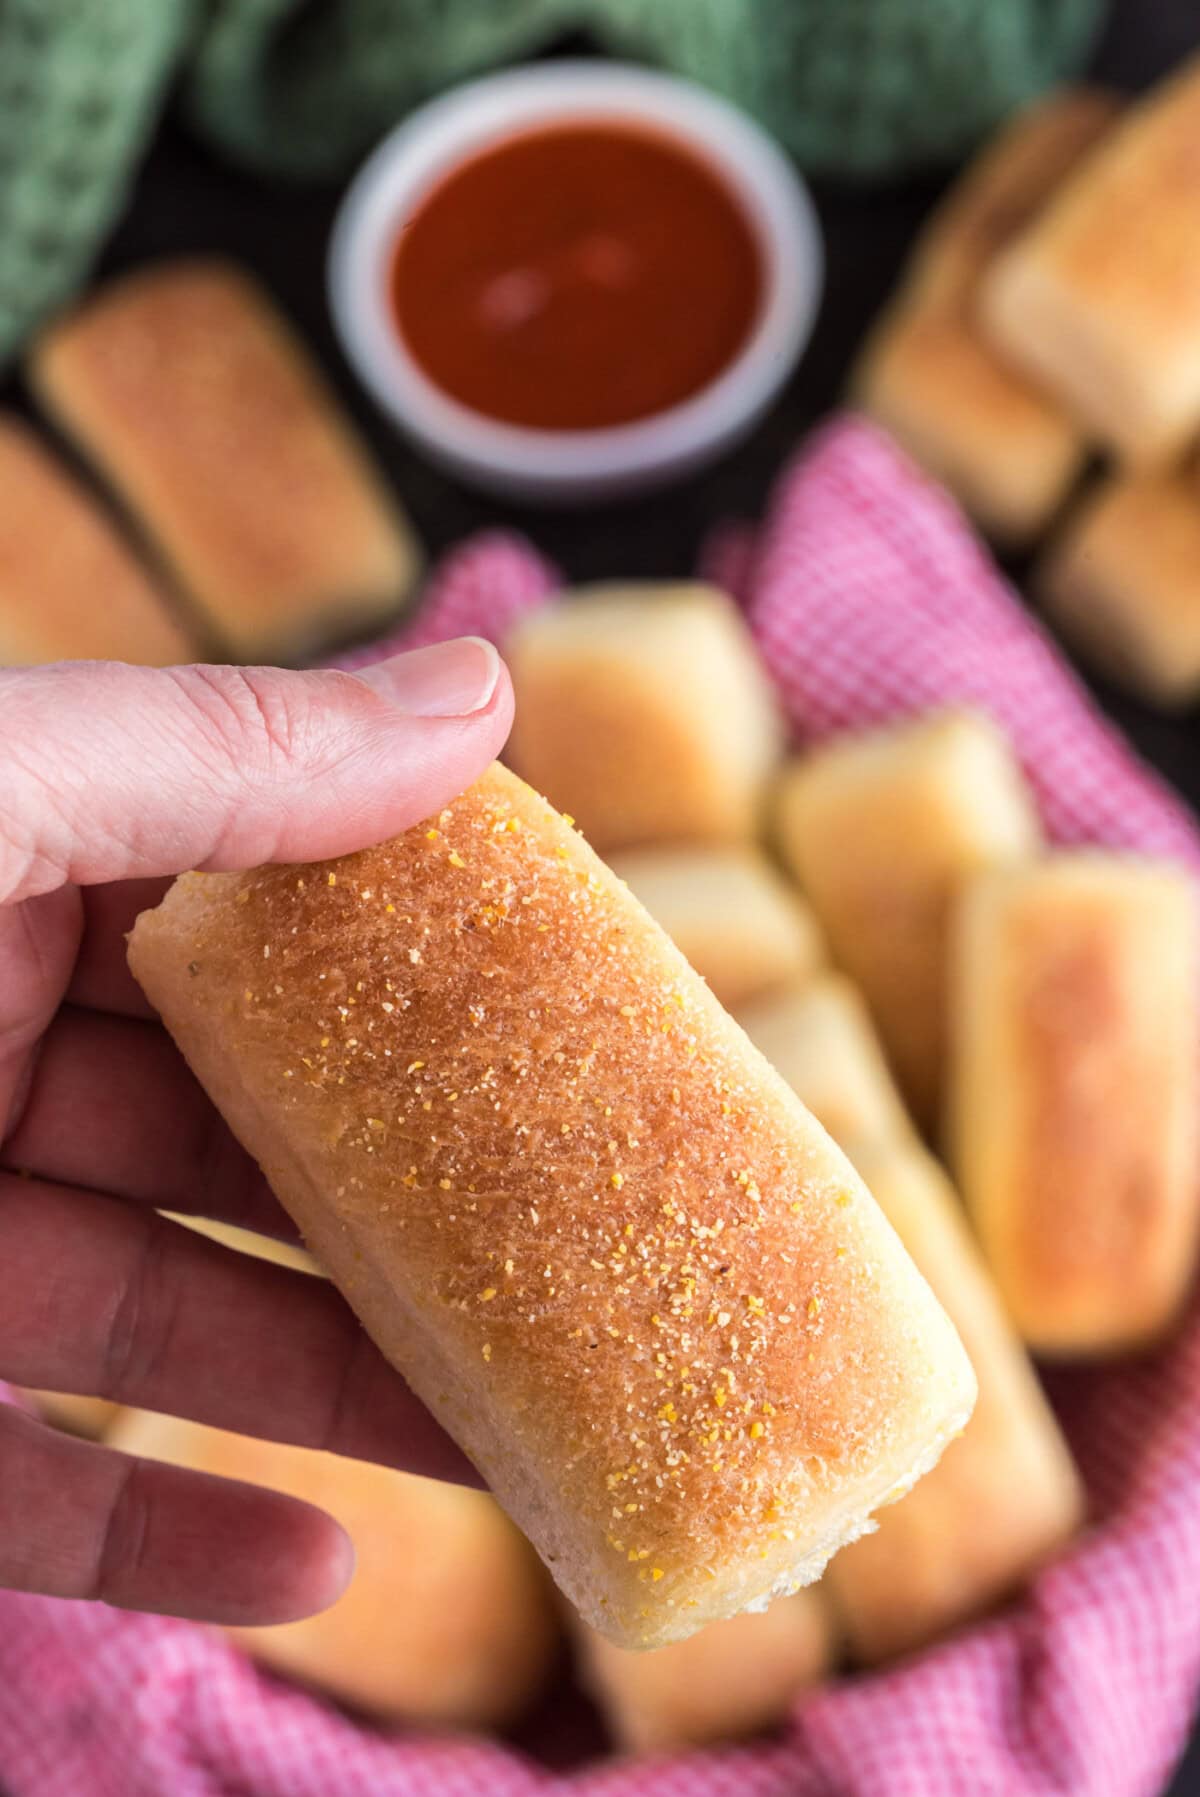
Soft with a golden brown exterior, these pull apart cornmeal dinner rolls are begging for a pat of butter. They’re made entirely from scratch featuring a surprise ingredient – cornmeal!
Why this recipe works
There’s nothing quite like toasty warm pull apart cornmeal dinner rolls dipped in beef stew or marinara. What sets these rolls apart from the rest is the addition of cornmeal which adds a nice pop of texture against the soft, fluffy interior.
Although they are called “rolls”, they’re actually shaped into finger-sized sticks that resemble mini bread loaves. Overall, they can be considered a cross between a dinner roll, a breadstick, and cornbread with elements of each that shine through.
Ingredients you will need
Get all measurements, ingredients, and instructions in the printable version at the end of this post.
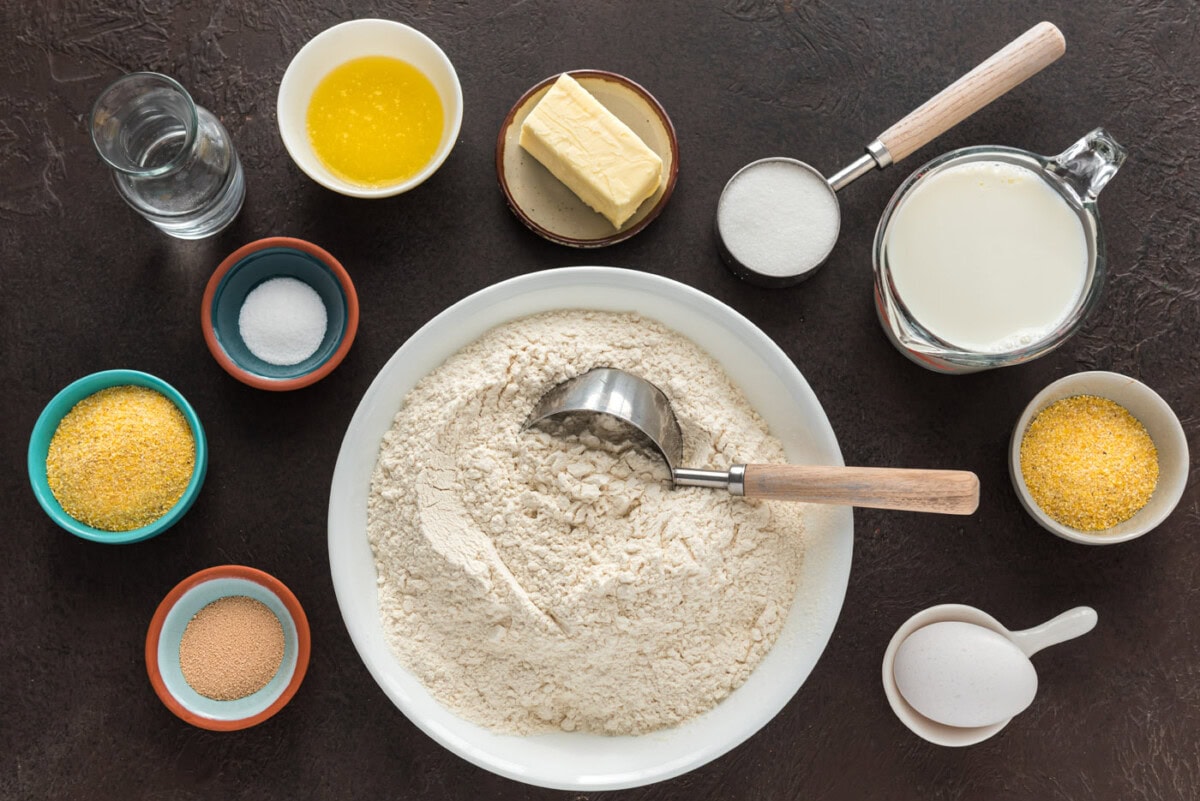
Ingredient Info and Substitution Suggestions
YEAST – This recipe calls for active dry yeast, not to be confused with instant dry yeast. Active dry yeast needs to be dissolved in water before being incorporated into recipes. Be sure that your active dry yeast is not expired before beginning.
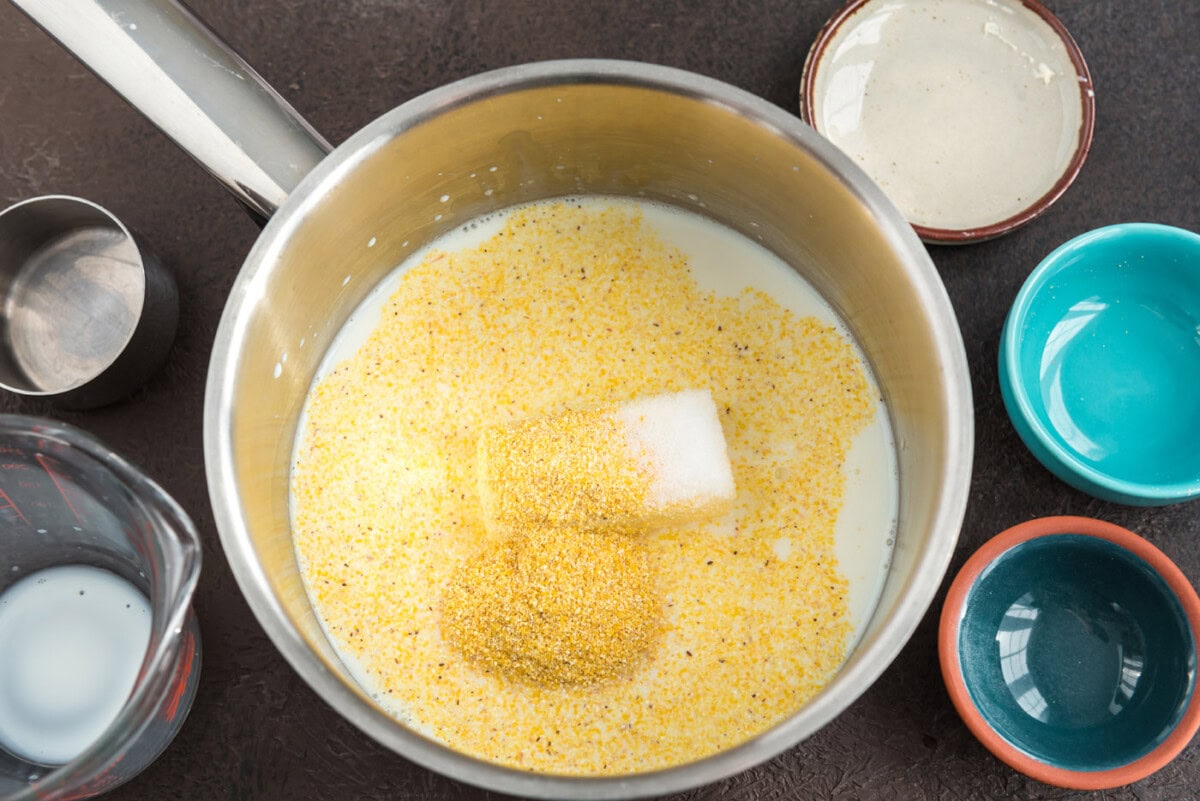
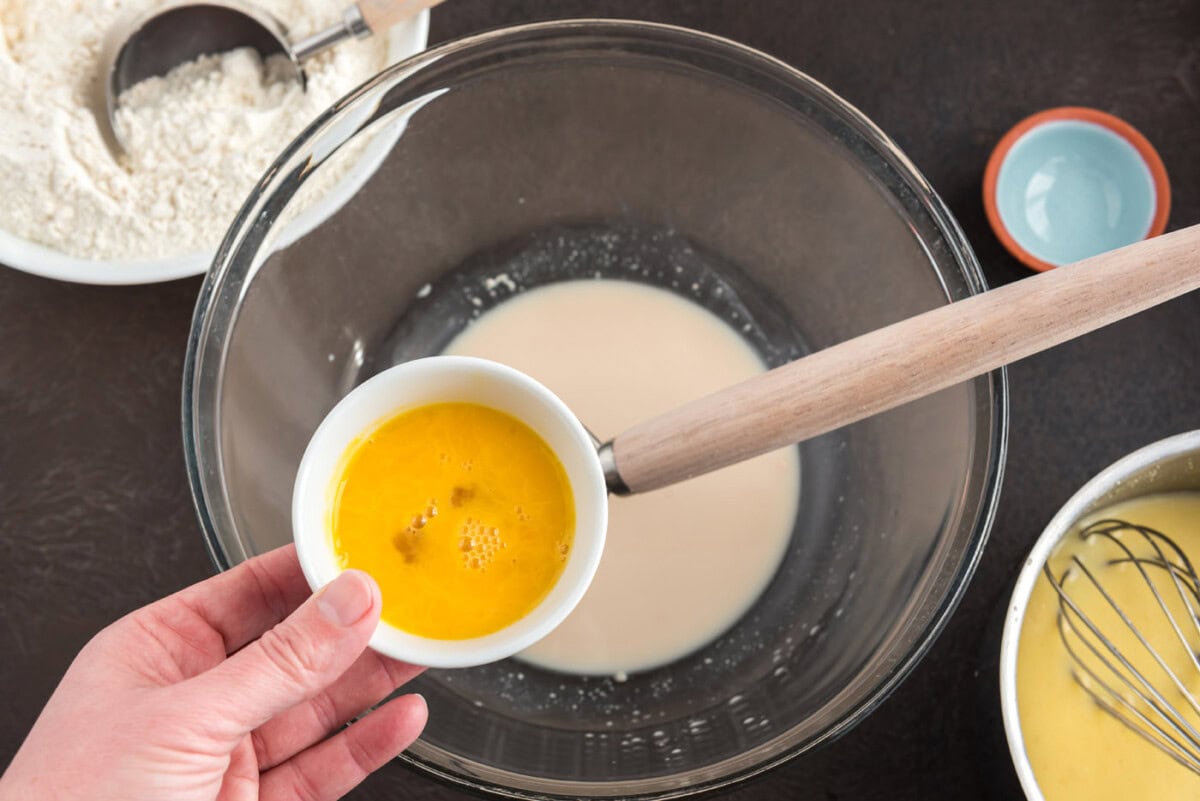
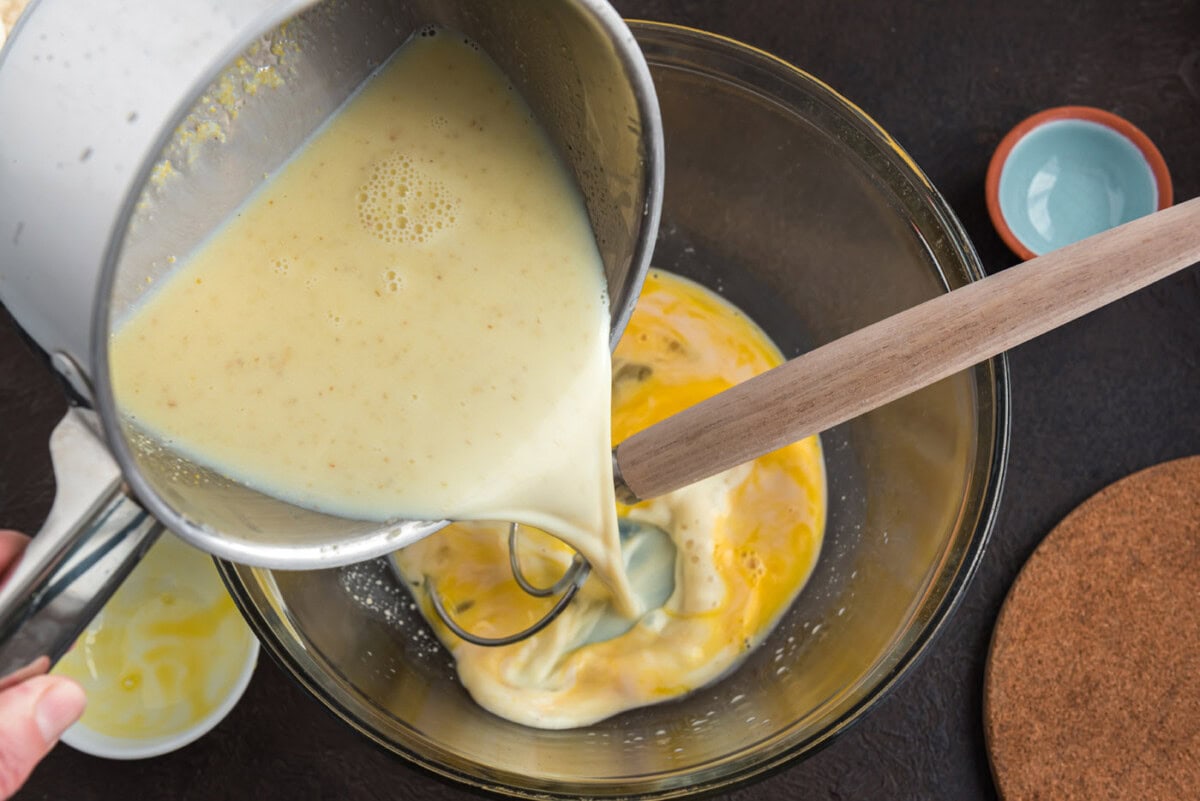
How to Make Pull Apart Cornmeal Dinner Rolls
These step by step photos and instructions are here to help you visualize how to make this recipe. You can Jump to Recipe to get the printable version of this recipe, complete with measurements and instructions at the bottom.
This recipe is adapted from Midwest Living Magazine.
- In a small saucepan, combine milk, sugar, 1/4 cup butter, 1/4 cup cornmeal, and salt; cook and stir until warm (105 degrees F to 115 degrees F).
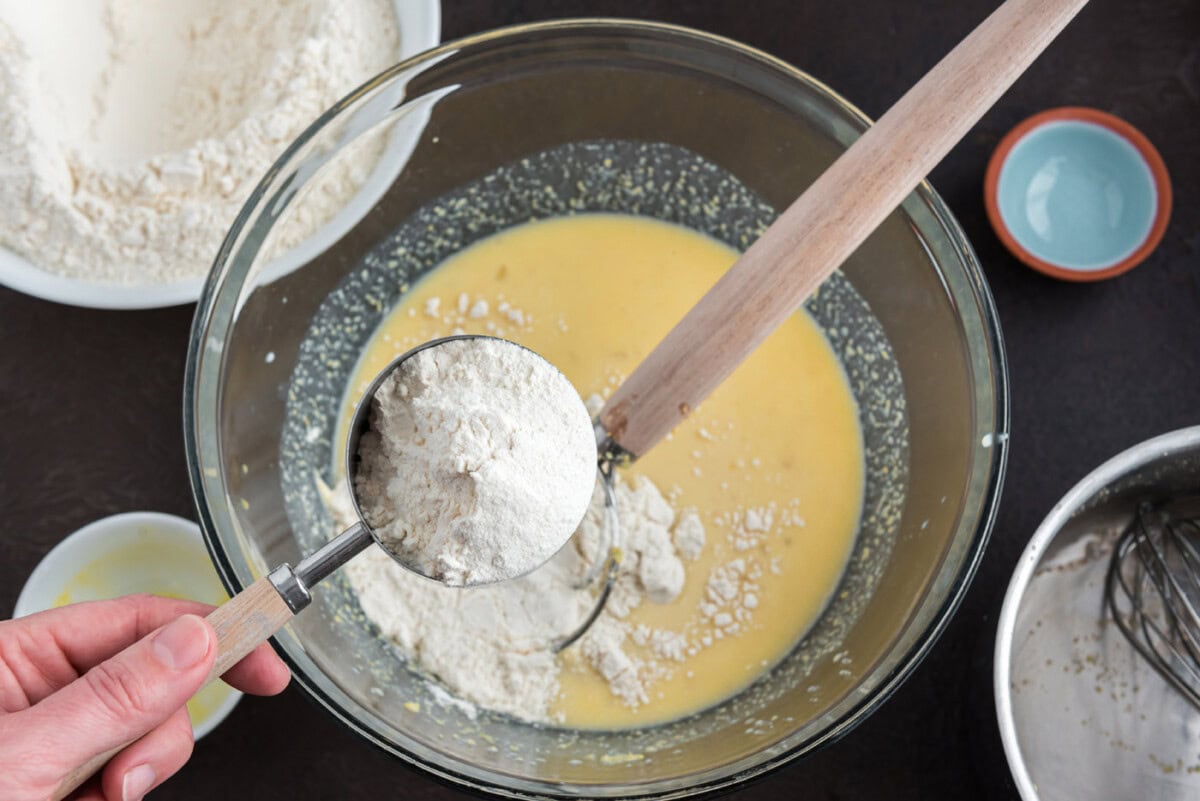
- In large bowl, dissolve yeast in warm water. Add egg and milk mixture. Gradually stir in enough flour to make a soft dough.
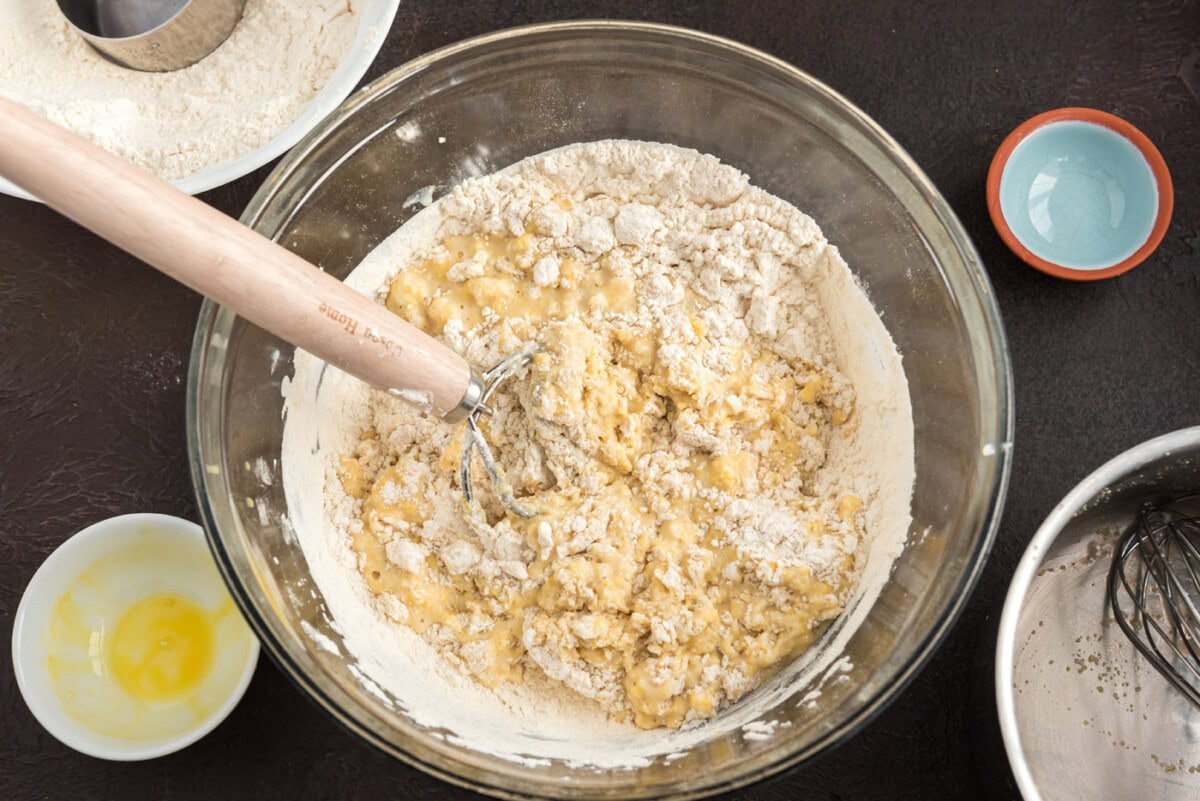
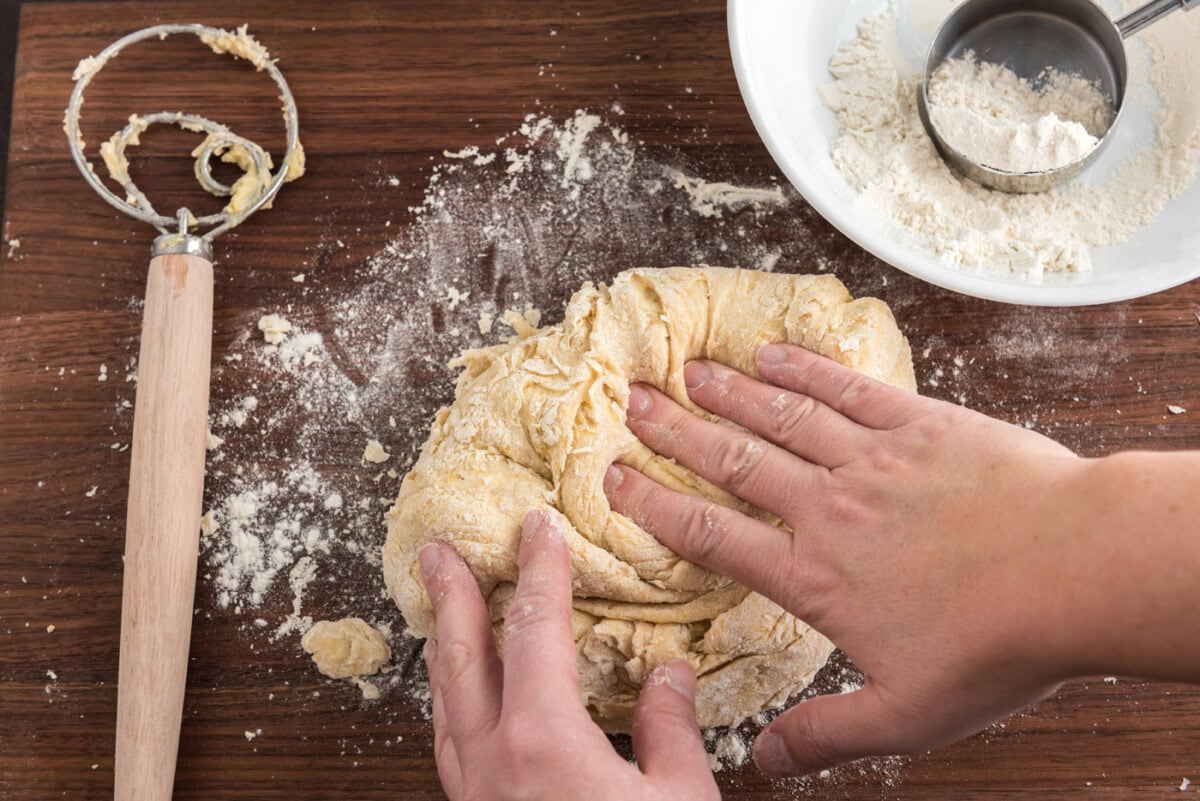
- Turn out onto a lightly floured surface; knead gently for 2 to 3 minutes to make a smooth ball. (Knead in just enough remaining flour so dough is no longer sticky.)
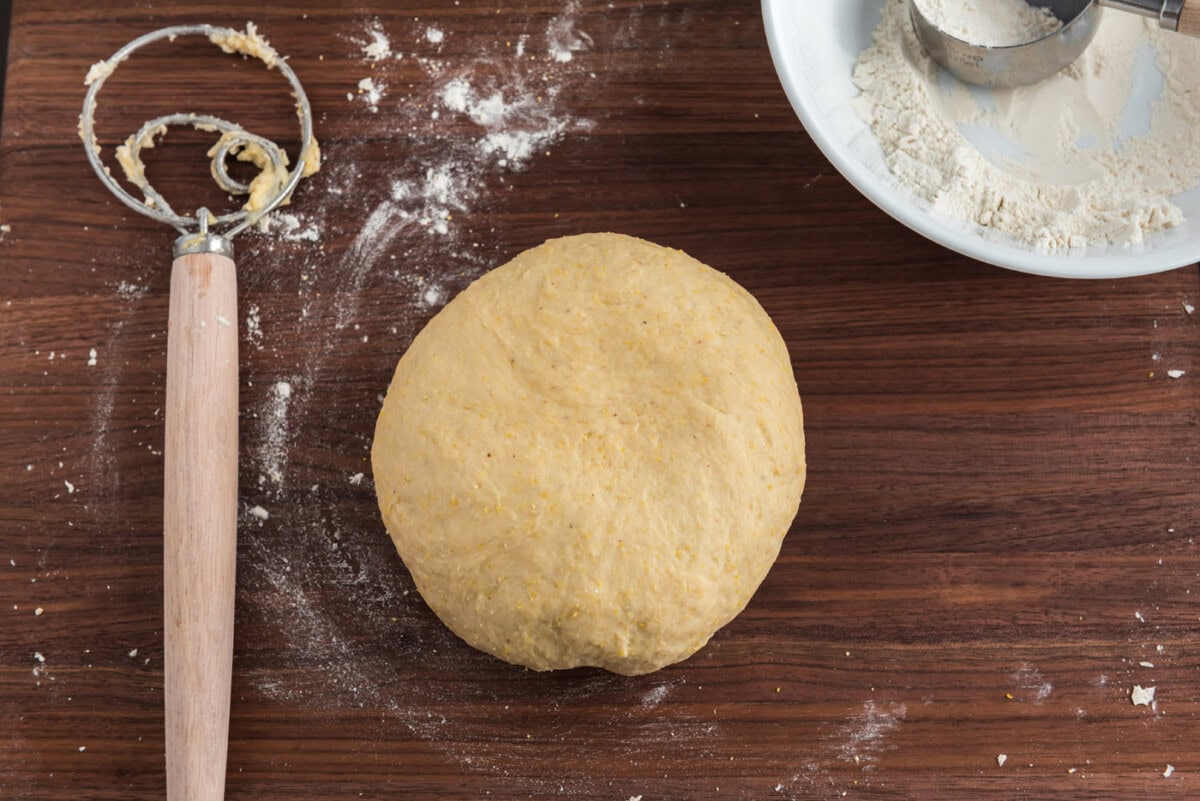
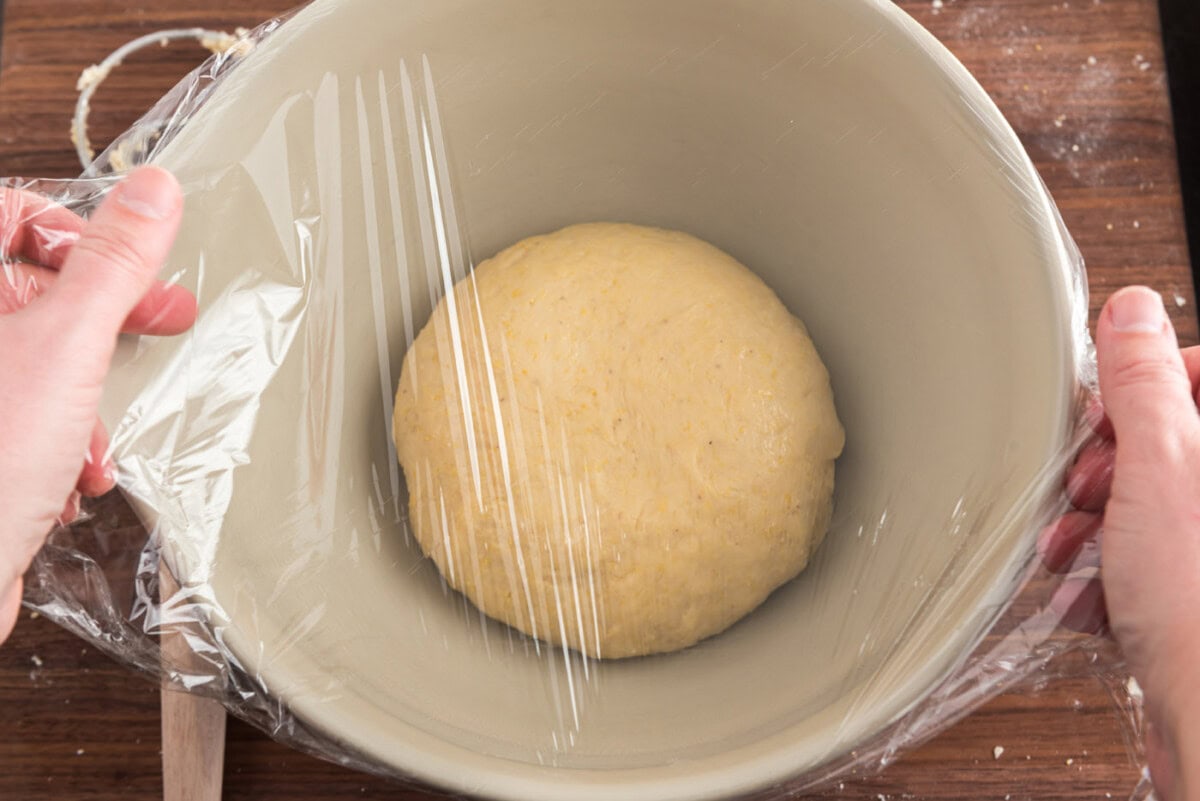
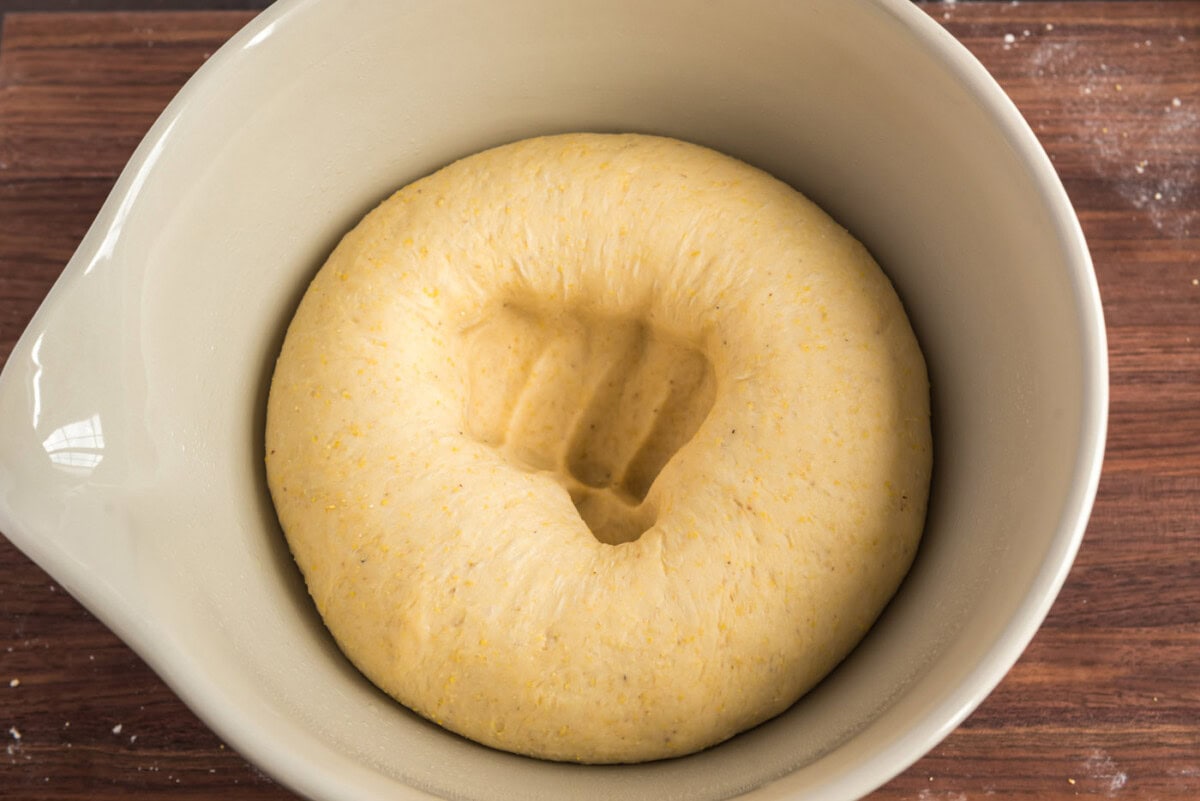
- Place in a greased bowl, turning once to grease the surface. Cover and let rise in a warm place until doubled in size (1 hour).
- Punch the dough down and turn it out on a lightly floured surface. Let dough rest for 10 minutes. Grease a 15x10x1-inch baking pan.
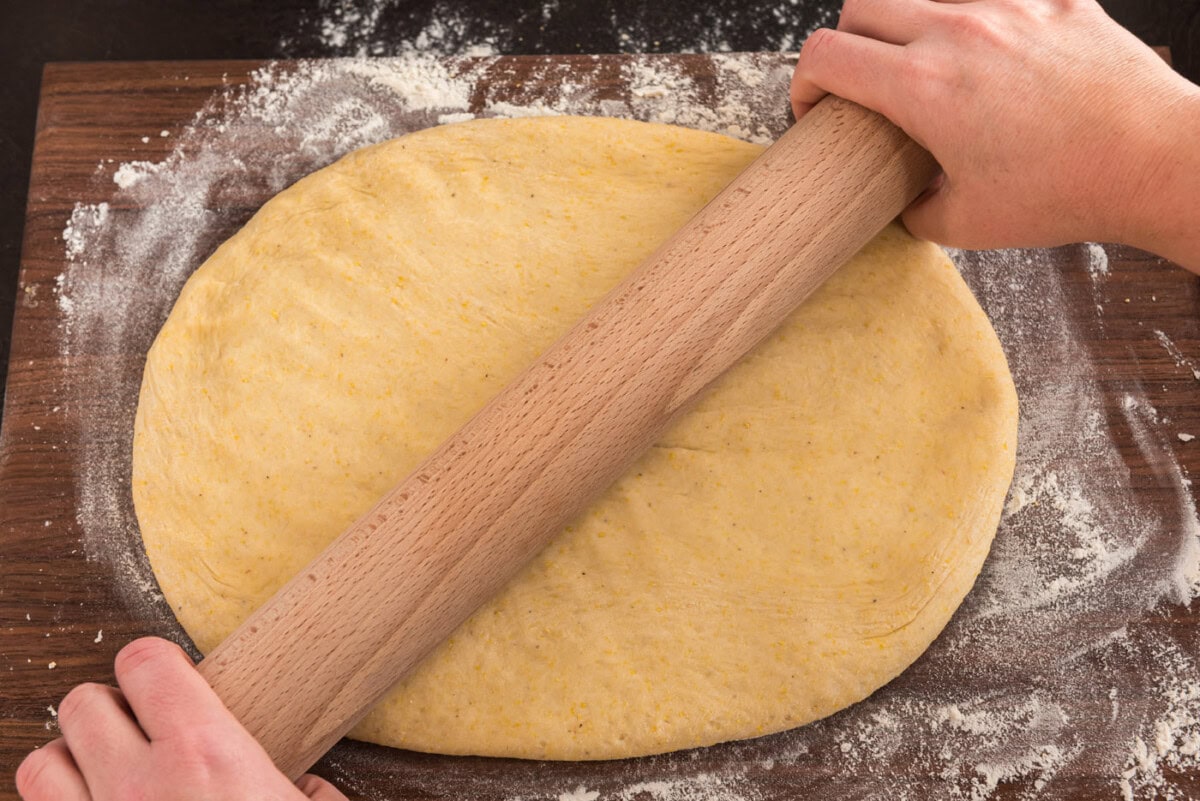
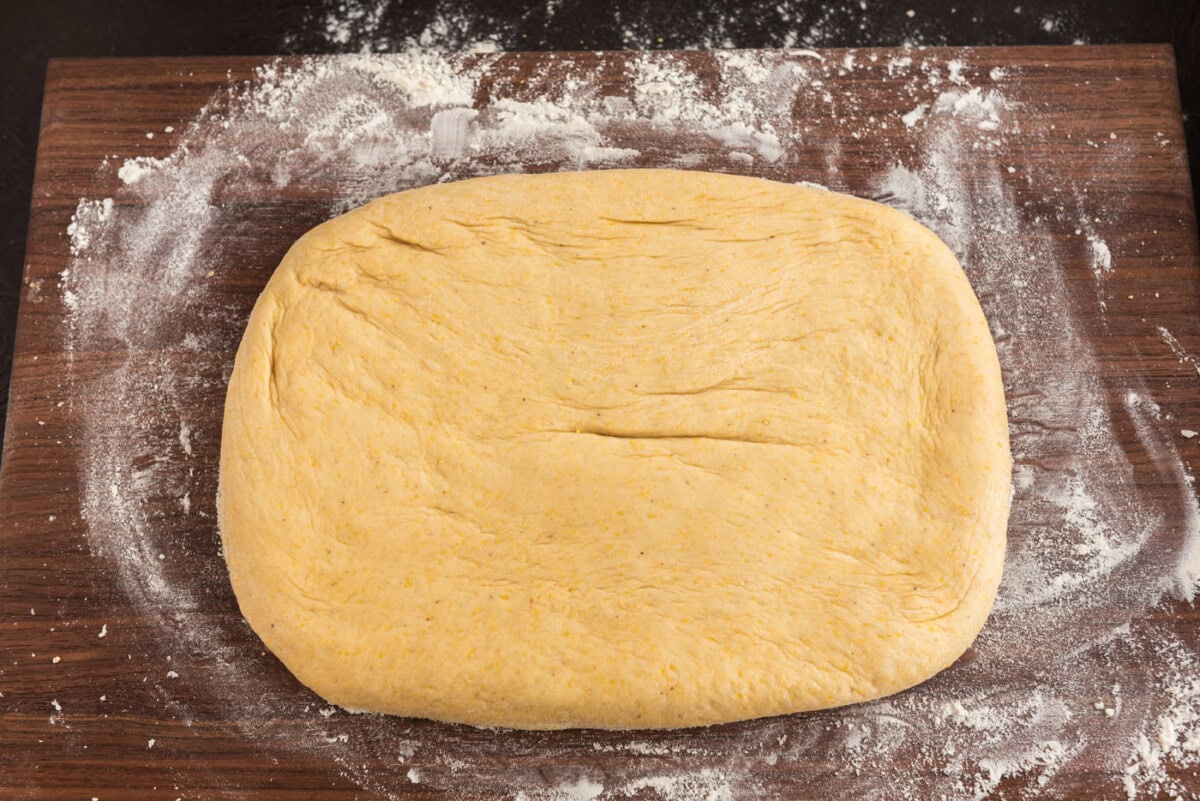
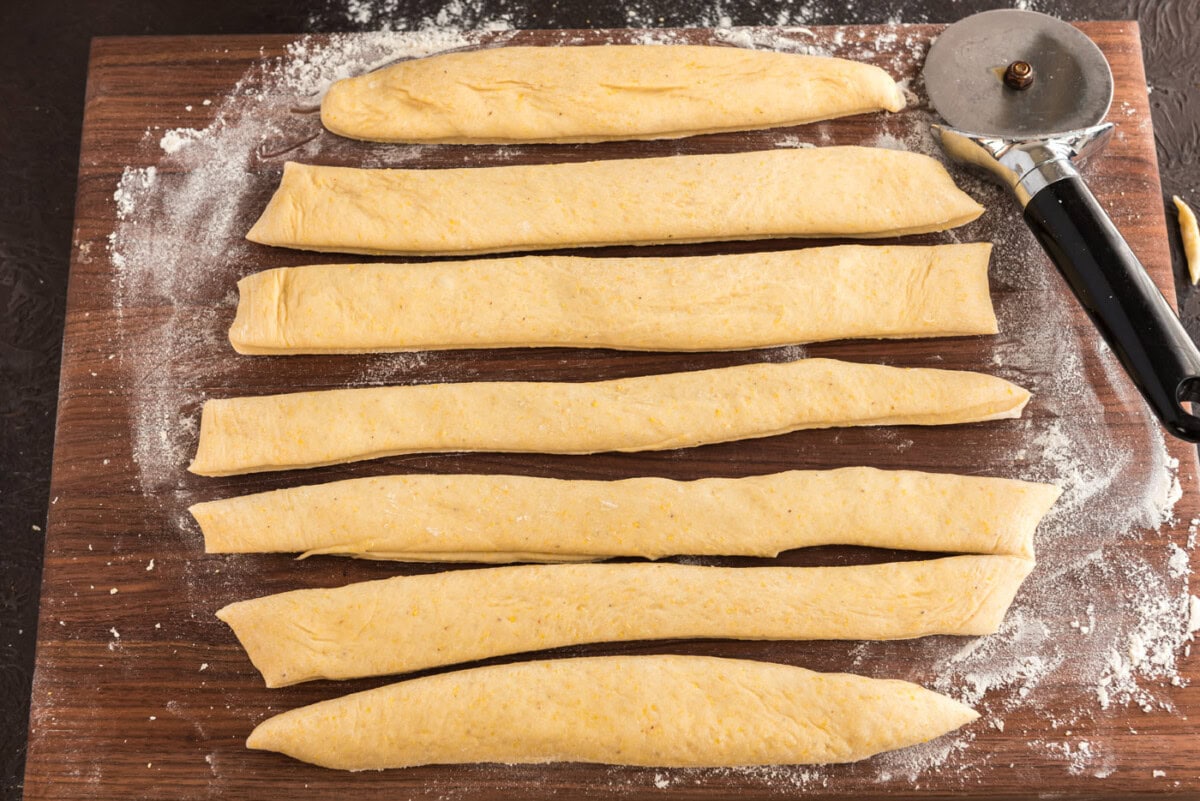
- To shape rolls, roll or pat dough to a 10×8-inch rectangle about 3/4-inch thick. Cut into 2-1/2×1-inch strips. Arrange strips in prepared pan, leaving about 1/2 inch between each strip. Cover and let rise until nearly doubled in size (about 30 minutes).
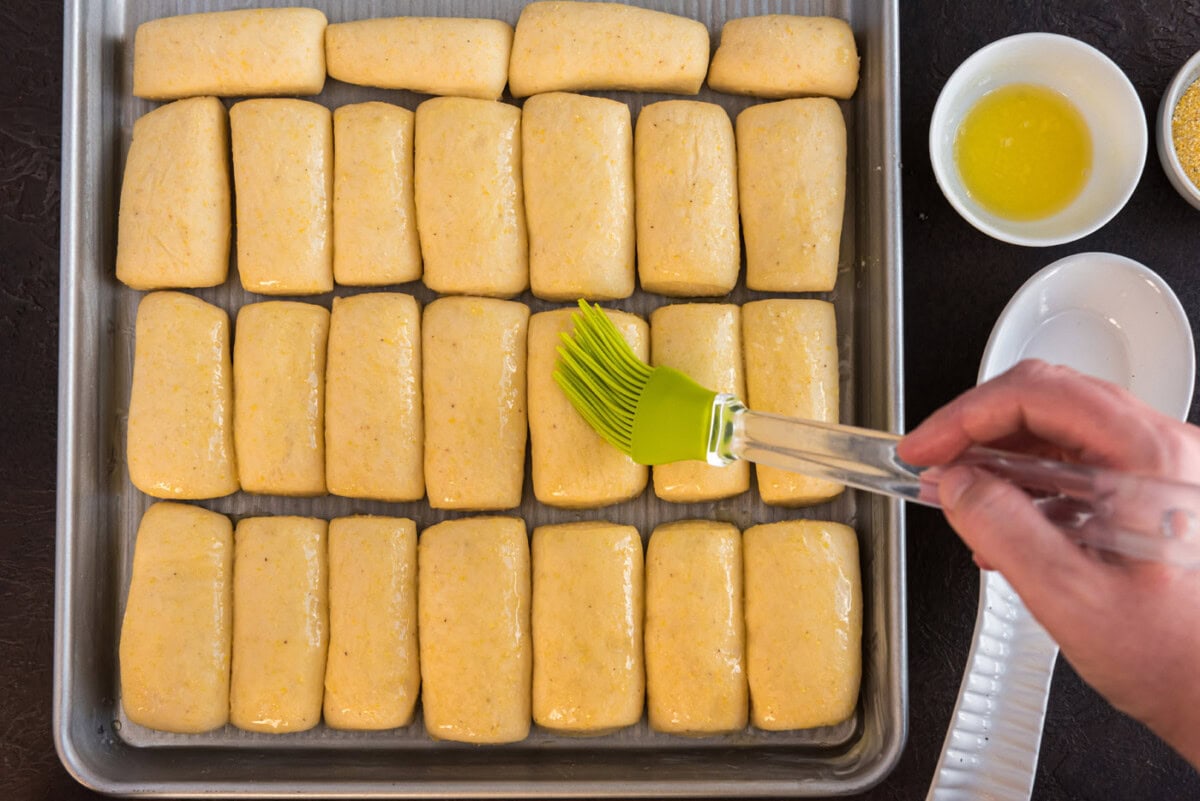
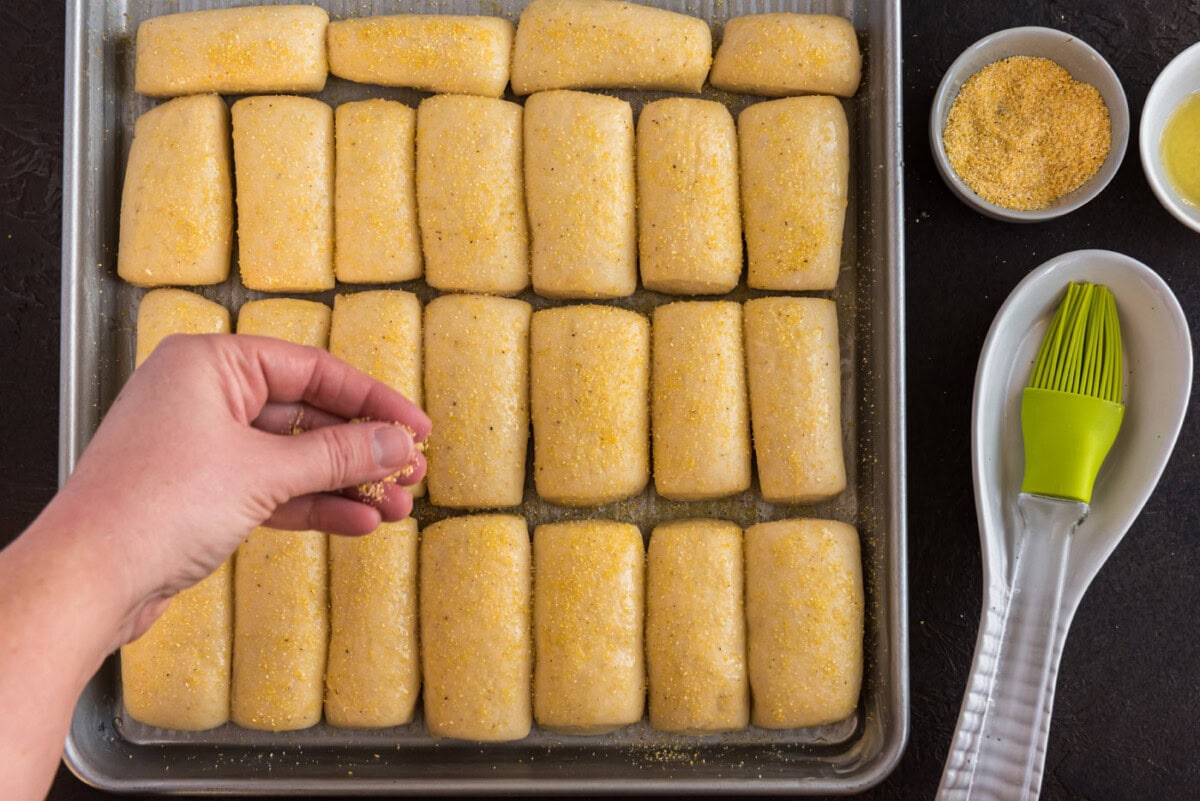
- Brush with melted butter. Optionally sprinkle with additional cornmeal. Bake in a 400-degree F oven for 12 to 15 minutes, or until golden and rolls sound hollow when gently tapped. Remove from pan.
Frequently Asked Questions & Expert Tips
Yes, definitely. You can shape these into traditional rolls if preferred following the same baking instructions.
Yes, you can prepare and shape the dough, cover it (before rising), and transfer it to the refrigerator for up to 1 day. Let the dough sit at room temperature for around 30 minutes before baking. You can also bake and freeze the rolls for later. Allow frozen rolls to come to room temperature and reheat if desired.
Once fully cooled, transfer the rolls to a large ziptop bag or air-tight container and store at room temperature for 3-4 days.
Serving Suggestions
These cornmeal dinner rolls are excellent slathered in butter, because what bread isn’t? If you’re serving them as a starter, pair them with marinara or garlic butter for dipping. As a dinner side, rolls are the perfect companion to a bowl of chili, stew, or soup – truthfully, they are good with just about any meal! Enjoy warm from the oven or at room temperature.
More Dinner Roll Recipes
I love to bake and cook and share my kitchen experience with all of you! Remembering to come back each day can be tough, that’s why I offer a convenient newsletter every time a new recipe posts. Simply subscribe and start receiving your free daily recipes!

Pull Apart Cornmeal Dinner Rolls
IMPORTANT – There are often Frequently Asked Questions within the blog post that you may find helpful. Simply scroll back up to read them!
Print It Pin It Rate ItIngredients
- 1 cup milk
- ¼ cup granulated sugar
- ¼ cup unsalted butter
- ¼ cup yellow cornmeal
- 1 teaspoon salt
- 1 package active dry yeast 2 1/4 teaspoons or 1/4 ounce
- ¼ cup warm water 105F – 115F
- 1 egg lightly beaten
- 3 ½ – 4 cups all purpose flour
- unsalted butter melted
- yellow cornmeal optional as topping
Things You’ll Need
- Jelly roll pan 15x10x1
Before You Begin
- This recipe calls for active dry yeast, not to be confused with instant dry yeast. Active dry yeast needs to be dissolved in water prior to being incorporated into recipes. Be sure that your active dry yeast is not expired before beginning.
Instructions
- In a small saucepan, combine milk, sugar, 1/4 cup butter, 1/4 cup cornmeal, and salt; cook and stir until warm (105 degrees F to 115 degrees F).
- In a large bowl, dissolve yeast in warm water. Add egg and milk mixture. Gradually stir in enough flour to make a soft dough.
- Turn out onto a lightly floured surface; knead gently for 2 to 3 minutes to make a smooth ball. (Knead in just enough remaining flour so the dough is no longer sticky.)
- Place in a greased bowl, turning once to grease the surface. Cover and let rise in a warm place until doubled in size (1 hour).
- Punch the dough down and turn it out on a lightly floured surface. Let dough rest for 10 minutes. Grease a 15x10x1-inch baking pan.
- To shape rolls, roll or pat dough to a 10×8-inch rectangle about 3/4-inch thick. Cut into 2-1/2×1-inch strips. Arrange strips in prepared pan, leaving about 1/2 inch between each strip. Cover and let rise until nearly doubled in size (about 30 minutes).
- Brush with melted butter. Optionally sprinkle with additional cornmeal. Bake in a 400-degree F oven for 12 to 15 minutes, or until golden and rolls sound hollow when gently tapped. Remove from pan.
Expert Tips & FAQs
- Leftovers – Once fully cooled, transfer the rolls to a large ziptop bag or air-tight container and store at room temperature for 3-4 days.
- Make Ahead – prepare and shape the dough, cover it (before rising), and transfer it to the refrigerator for up to 1 day. Let the dough sit at room temperature for around 30 minutes before baking. You can also bake and freeze the rolls for later. Allow frozen rolls to come to room temperature and reheat if desired.
Nutrition
The recipes on this blog are tested with a conventional gas oven and gas stovetop. It’s important to note that some ovens, especially as they age, can cook and bake inconsistently. Using an inexpensive oven thermometer can assure you that your oven is truly heating to the proper temperature. If you use a toaster oven or countertop oven, please keep in mind that they may not distribute heat the same as a conventional full sized oven and you may need to adjust your cooking/baking times. In the case of recipes made with a pressure cooker, air fryer, slow cooker, or other appliance, a link to the appliances we use is listed within each respective recipe. For baking recipes where measurements are given by weight, please note that results may not be the same if cups are used instead, and we can’t guarantee success with that method.
This post originally appeared here on April 1, 2009 and has since been updated with new photos and expert tips.
- Pineapple Salsa - July 16, 2026
- 26 Best Ground Beef Casseroles for Easy Family Dinners - July 8, 2026
- Strawberry Shortcake Kabobs - July 2, 2026


Arlene says
It is Ottawa, not Ottowa. I was looking for a recipe close to Zola’s buns as they are delicious. On one of their pages, it says they are semolina buns.
Amanda Formaro says
I’m confused by your Ottawa comment. I didn’t mention Ottawa anywhere in the post?
sheila @ Elements says
These sound great! I'll have to make a batch these days! Thanks! :)
One of Ottawa's Real Foodies says
Thanks for the info on parbaking the dinner rolls. As an FYI, I also made these buns a while ago. I was drawn to them because the recipe reminded me so much about our favorite rolls at our regular restaurant, Zola's. We went there last week after a long absence and I just had to do a shout out to you. The recipe is very close to what Zola's bakes in-house.
http://ottawafood.blogspot.com/2010/05/zolas-trip-down-memory-lane.html
Amanda says
I'm thinking you may have just read the recipe too quickly. It states:
"In small saucepan, combine milk, sugar, 1/4 cup butter, 1/4 cup cornmeal and salt; cook and stir until warm (105 degrees F to 115 degrees F).
In large bowl, dissolve yeast in warm water. Add egg and milk mixture. Gradually stir in enough flour to make a soft dough. "
So, you combine everything in the first paragraph – that makes up the milk mixture.
Then you dissolve the yeast in the warm water.
Then you add the egg and the milk mixture to the yeast mixture and continue with the recipe. Enjoy!
Anonymous says
"Add Egg and Milk Mixture" …Where does it say Add Egg to Milk Mixture?
Don't see where the Egg goes in at any point in the Recipe..
Culinary Cory says
I’m going to add this to my list of things to make. Your pictures make them look really tasty.
Carrie says
Amanda, I made these last night for supper. I added a dash or two of Italian season when I mixed these up It helped the flavor of the bread.
I also think now that when I make these again I will sprinkle a bit of garlic over the top of these when I butter then before baking. ‘Course hubby is a garlic fan and we garlic most things.
Elle says
oh, pretty rolls and pretty photos, too! Good job on the lightbox!
Ingrid says
Those look terrific…both the photos and the rolls themselves!
My honey made me one of those light boxed but my light clip on to the sides and shine inside from the front. I like how yours shines in through the sides.
~ingrid
Kim says
I might have to make those rolls this weekend. You pictures look great. Can’t wait to see the instructions on the light box!
Tami says
The rolls look really good. I bet they were fantastic dipped into soup!
Great work making your own light box!
MaryBeth says
These little Dinner Rolls look amazing Amanda. I am sure they taste wonderful!
Coleen's Recipes says
Fabulous photos. I don’t have a light box…I’m envious.
5 Star Foodie says
The photos look great and the rolls look very delicious!
Carrie says
Oh, those look delicious. I think I will steal the recipe and make those for supper tomorrow night. ;-)
Rachelle @ "Mommy? I'm Hungry!" says
These look great!!
I’m still bugging my Husband to buy me stuff so I can set up a light box.
Maria says
Love the photos! Nice job on creating your own light box, we bought one, but I still struggle because I don’t know how to use the darn camera. Too many settings:)