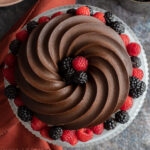
Chocolate Pound Cake
Our chocolate pound cake recipe goes the extra mile with a decadent chocolate shell that provides a lovely bit of texture against a dense yet soft cake.
Servings: 16 servings
Calories: 501cal
Equipment
- Silicone bundt pan
Ingredients
- 2 1/4 cup all-purpose flour
- 1 cup unsweetened cocoa dutch cocoa or regular unsweetened
- 1 tsp baking powder
- 1/4 tsp baking soda
- 1 1/4 tsp salt
- 1 tsp cinnamon optional
- 2 cup granulated sugar
- 1 1/2 cup salted butter at room temperature
- 3/4 cup milk whole or 2%
- 1/3 cup sour cream or plain yogurt
- 1 Tbsp vanilla extract
- 6 eggs
- 1/3 cup hot water
Chocolate Coating
- 2 cups semi-sweet chocolate chips
- 1 tsp crisco or butter
Instructions
- Preheat your oven to 350F. Prep a silicone baking bundt mold by lightly spraying it with baking spray. Silicone is usually nonstick, however, sometimes the corners still stick and since we want crisp edges on this cake, it’s best to spray it for good measure.
- In a medium sized bowl, combine the flour, cocoa, baking powder, baking soda, salt and cinnamon. Set aside.
- In the bowl of a stand mixer, combine the butter and sugar. Using the paddle attachment, cream them together on medium speed for 1 minute. Add in the milk, sour cream and vanilla and beat together. Add in the eggs one at a time while the mixer is still running. Once everything is well incorporated, add in the flour mixture and mix for 1 minute. Add in the hot water and mix for another 30 seconds.
- Pour cake batter into prepared silicone mold. Bake for 70-80 minutes or until a toothpick inserted comes out clean or with moist crumbs. Remove from the oven and let cool completely down. Mine rose a bit in the center so I flipped it onto a plate to cool allowing the top to deflate so it would sit more level with a cake stand. TIP - If your silicone mold is wobbly and does not hold its shape well, you may want to put it onto a flat baking sheet before placing it into the oven so it retains its shape while baking.
- Once your cake is cooled, prep the chocolate topping by placing the chocolate chips and crisco in a medium size, microwave safe bowl. Heat in 30 second increments, stirring in between. Be sure to stir well all the way to the bottom so it does not burn or seize. This should take about 1 ½ - 2 minutes.
- Gently remove the cake from the silicone mold. You may need to rinse or wipe out your mold to ensure it is clean. Pour the chocolate into the mold and using a pastry brush or the back of a spoon, spread the chocolate around the entire mold as evenly as possible. If you have excess chocolate pooled in the bottom once you are done, simply pour it back into the bowl. Carefully place your cooled cake back into the mold ensuring that you line it up with it’s initial grooves. Place into the freezer for at least 2 hours to firm.
- Remove your chocolate covered cake from the silicone mold and place onto a plate. If there are any holes or cracks where the chocolate is too thin, you may do another layer of chocolate by brushing the mold and placing the covered cake back into it and into the freezer to freeze again.
- Serve and enjoy!
Notes
- I used salted butter for this recipe. If you use unsalted butter, simply add an extra ½ tsp of salt.
- This recipe has only been tested with all-purpose flour, however, it may be attempted with good results using a gluten-free flour blend such as Pillsbury or Bob’s Red Mill.
- It's also worth noting that you can add chocolate chips to the batter before baking if desired!
- This is the bundt cake mold we used, this recipe will make about 3 cakes using this pan.
Nutrition
Serving: 1slice | Calories: 501cal | Carbohydrates: 54g | Protein: 7g | Fat: 30g | Saturated Fat: 18g | Polyunsaturated Fat: 1g | Monounsaturated Fat: 8g | Trans Fat: 1g | Cholesterol: 112mg | Sodium: 387mg | Potassium: 306mg | Fiber: 4g | Sugar: 34g | Vitamin A: 681IU | Vitamin C: 1mg | Calcium: 69mg | Iron: 3mg