Dutch Oven Bread
Dutch oven artisan bread has the best of both worlds - and it only takes around 4 hours from start to finish and less than a handful of ingredients to whip together with the basics of flour, salt, yeast, and water.
Servings: 12 servings
Calories: 155cal
Equipment
- Stand mixer with dough hook
- Dutch oven 4-6 quart
Ingredients
- 4 cups all-purpose flour
- 1/2 Tablespoon sea salt
- 1 teaspoon active dry yeast
- 1 1/2 cups warm water not warmer than 100F
Instructions
- In the bowl of a standing mixer, whisk together the flour, salt, and yeast until combined.
- Add the water to the flour mixture and beat to combine. Use the bread hook attachment on the mixer to mix dough on medium-high speed for 3-4 minutes, until the dough becomes elasticized and wraps into a ball around the hook.
- Scrape the dough from the hook and use a spatula or floured hands to form the dough into a ball.
- Place in the bottom of the bowl, cover with a light kitchen towel and set in a warm, draft-free location to rise for about 2 hours.
- After 2 hours, poke your fingers into the bread to deflate it and then turn it out onto a lightly floured board.
- Use a bench scraper (or your hands) to reform the dough back into a nice sturdy round of dough.
- Transfer the dough to a bowl on top of a sheet of parchment paper. Cover and allow to rise a second time (1-2 hours). If you gently press your finger in the dough and it does not bounce right back, it is ready to bake.
- 30 minutes to 1 hour before the bread is ready to bake, place the Dutch oven (with lid on) into the oven and preheat to 450°F. Allow the oven and Dutch oven to heat at this temperature for at least 30 minutes (I try to do 1 hour).
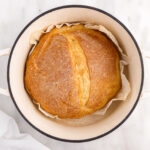
- Carefully take the hot Dutch oven out of the oven. Lift the dough loaf by the parchment paper into the hot Dutch oven.
- Score the loaf with the lame or a sharp serrated knife. This gives the bread an area for steam to escape and the loaf to puff during baking. A straight line or an x will work fine.
- Quickly place the lid onto the Dutch oven and return it to the oven. Bake for 30 minutes at 450°F.
- Remove the lid - turning the lid away from you so that the steam rises away and doesn’t burn you - and continue baking 5-10 minutes longer until the crust is deep golden brown.
- Remove from the oven and transfer the loaf to a cooling rack to cool completely.
Video
Notes
- If the water is too hot, it will kill the yeast and the dough will not rise. Lukewarm is fine.
- The salt is important for seasoning the bread - it will taste a bit flat if you don’t add enough salt to the dough
- Do not skip the step of preheating the Dutch oven. Preheating it will bring it to the correct temperature which is vital to baking your bread.
- If you’d like to add a bit of oil to the bowl or to coat the dough while it’s rising, that will help prevent a skin forming on the dough.
- The difference between no-knead recipes and a “knead” recipe mostly involves time. When you knead the dough (like we do here with the bread hook in the standing mixer), it begins to develop the gluten and that gluten is what gives the bread its structure. If you just roughly mix together the ingredients, you can set the bowl for the first rise - but it can take 7-8 hours rather than 2-3 when you spend a few extra minutes with the mixer at the beginning.
- Store the cooled Dutch oven bread in an airtight container once it has been cut into. This bread is best the first day after baking but can be stored for 5-6 days.
Nutrition
Serving: 1serving (1 slice) | Calories: 155cal | Carbohydrates: 32g | Protein: 5g | Fat: 0.5g | Saturated Fat: 0.1g | Polyunsaturated Fat: 0.2g | Monounsaturated Fat: 0.1g | Sodium: 294mg | Potassium: 54mg | Fiber: 1g | Sugar: 0.1g | Vitamin C: 0.003mg | Calcium: 8mg | Iron: 2mg